Hoofdstuk 101Cycles volledig
Sampling, denoising, light paths, performance, GPU — alle 105 instellingen
Cycles is Blenders padtracer (path tracer): een fysiek gebaseerde renderer die licht simuleert door het als stralen (paths) door de scène te volgen. Trager dan EEVEE, maar zonder de benaderingen — reflecties, schaduwen en global illumination kloppen automatisch, zonder dat je light probes hoeft te plaatsen.
 RECCONCEPT00:00:00:00schoolium
Hoe path tracing werkt, zonder formules
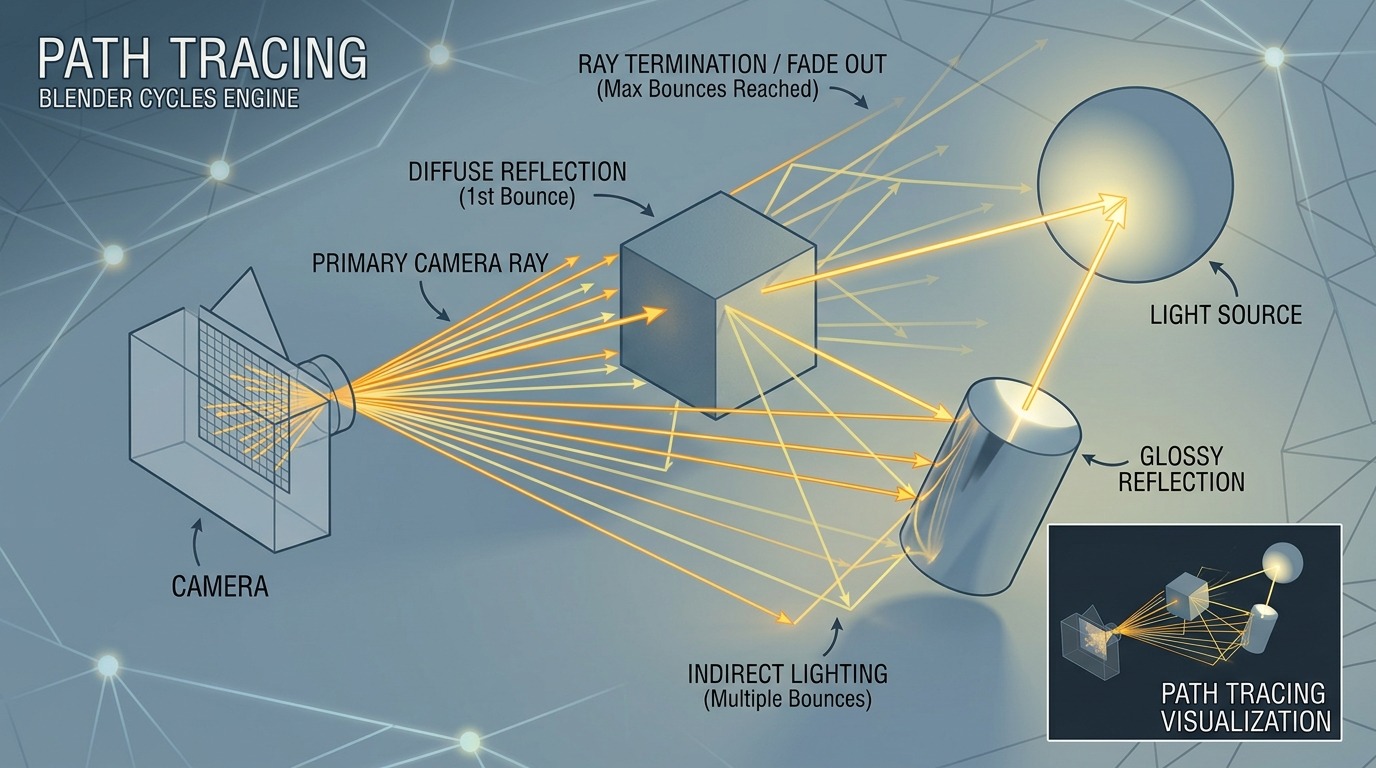
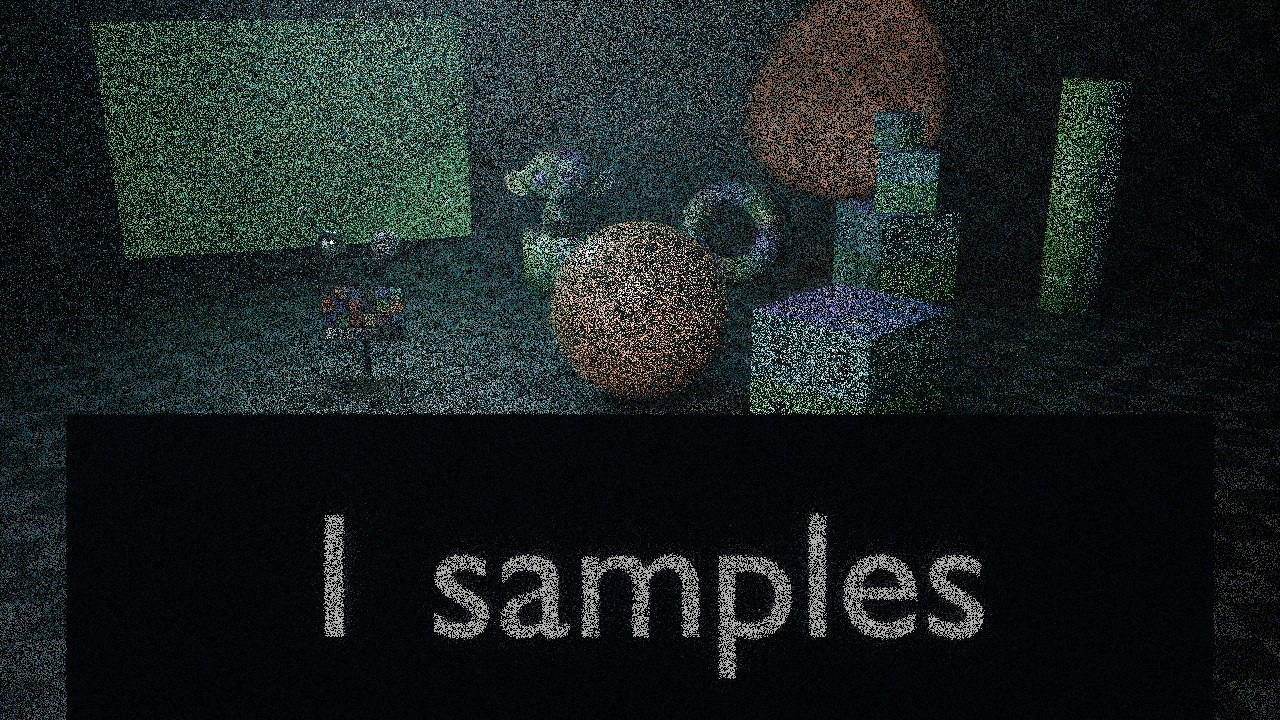
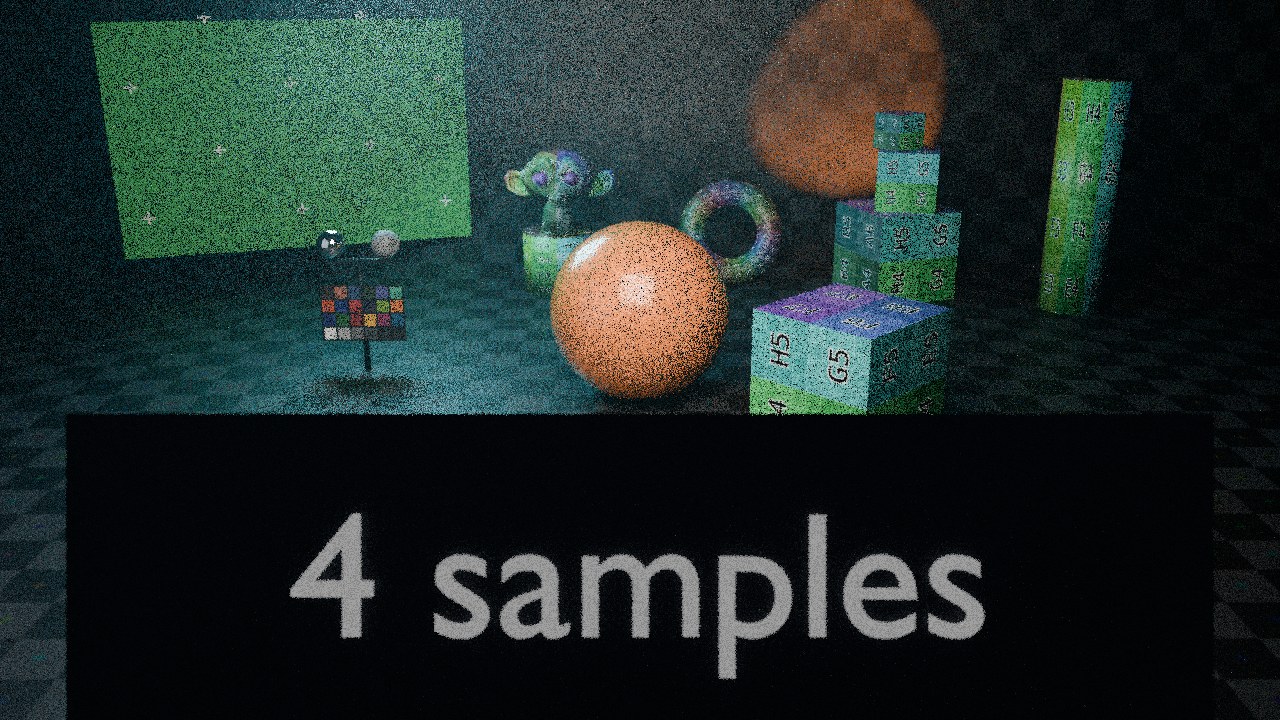
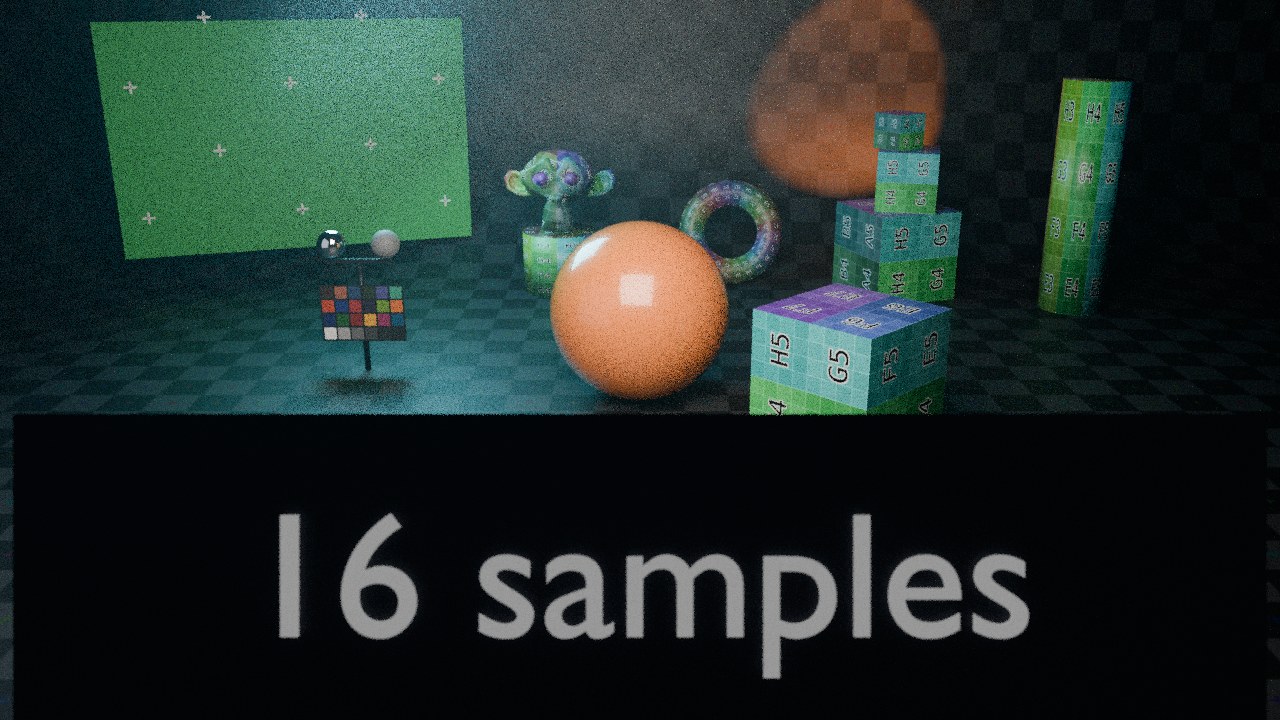
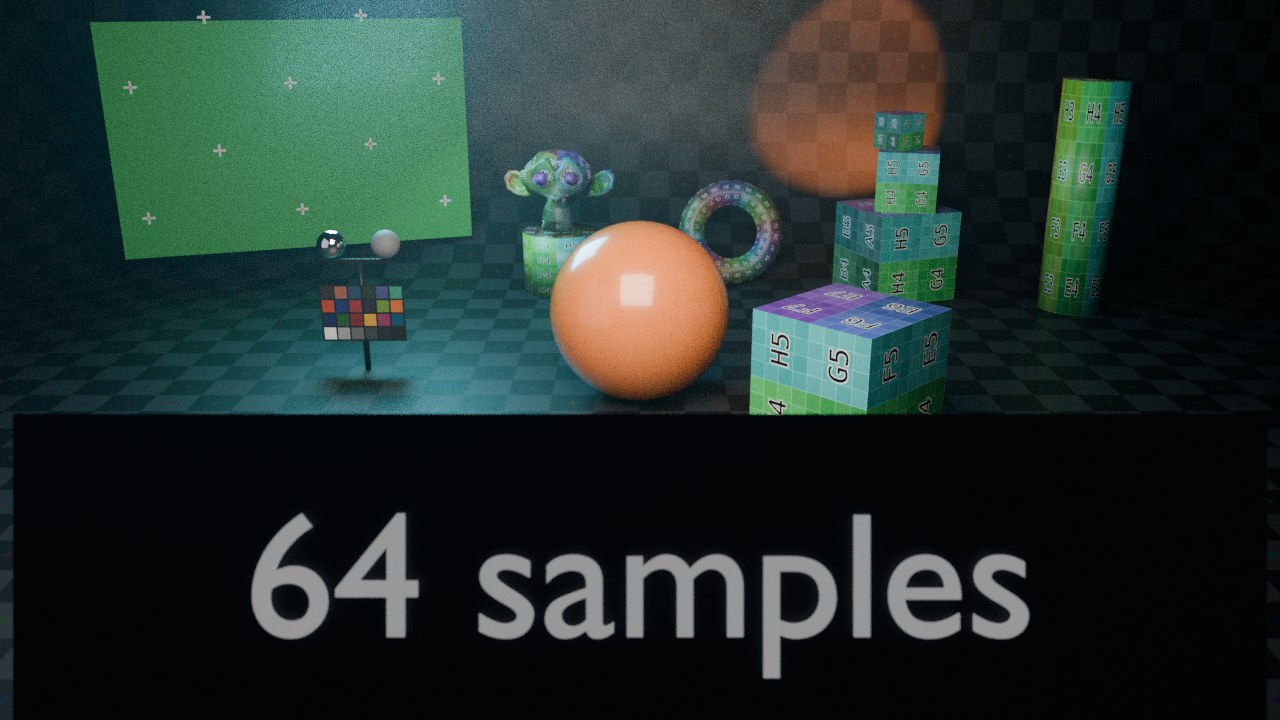
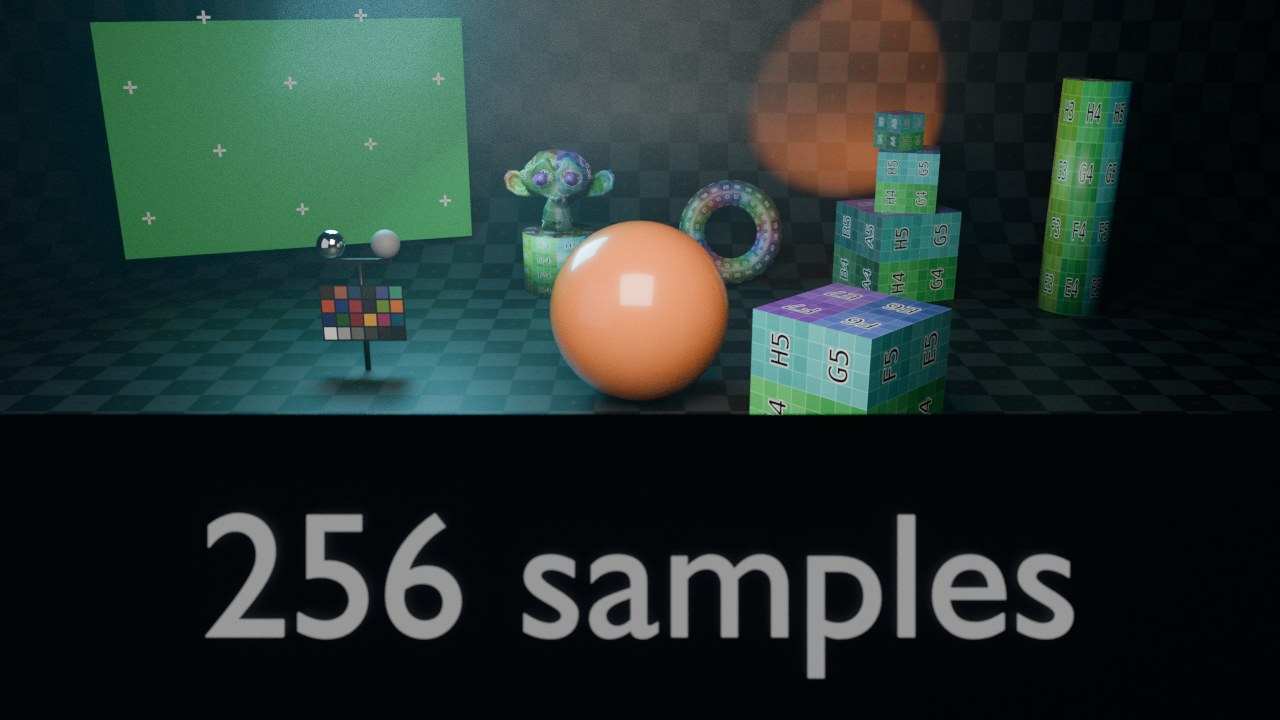
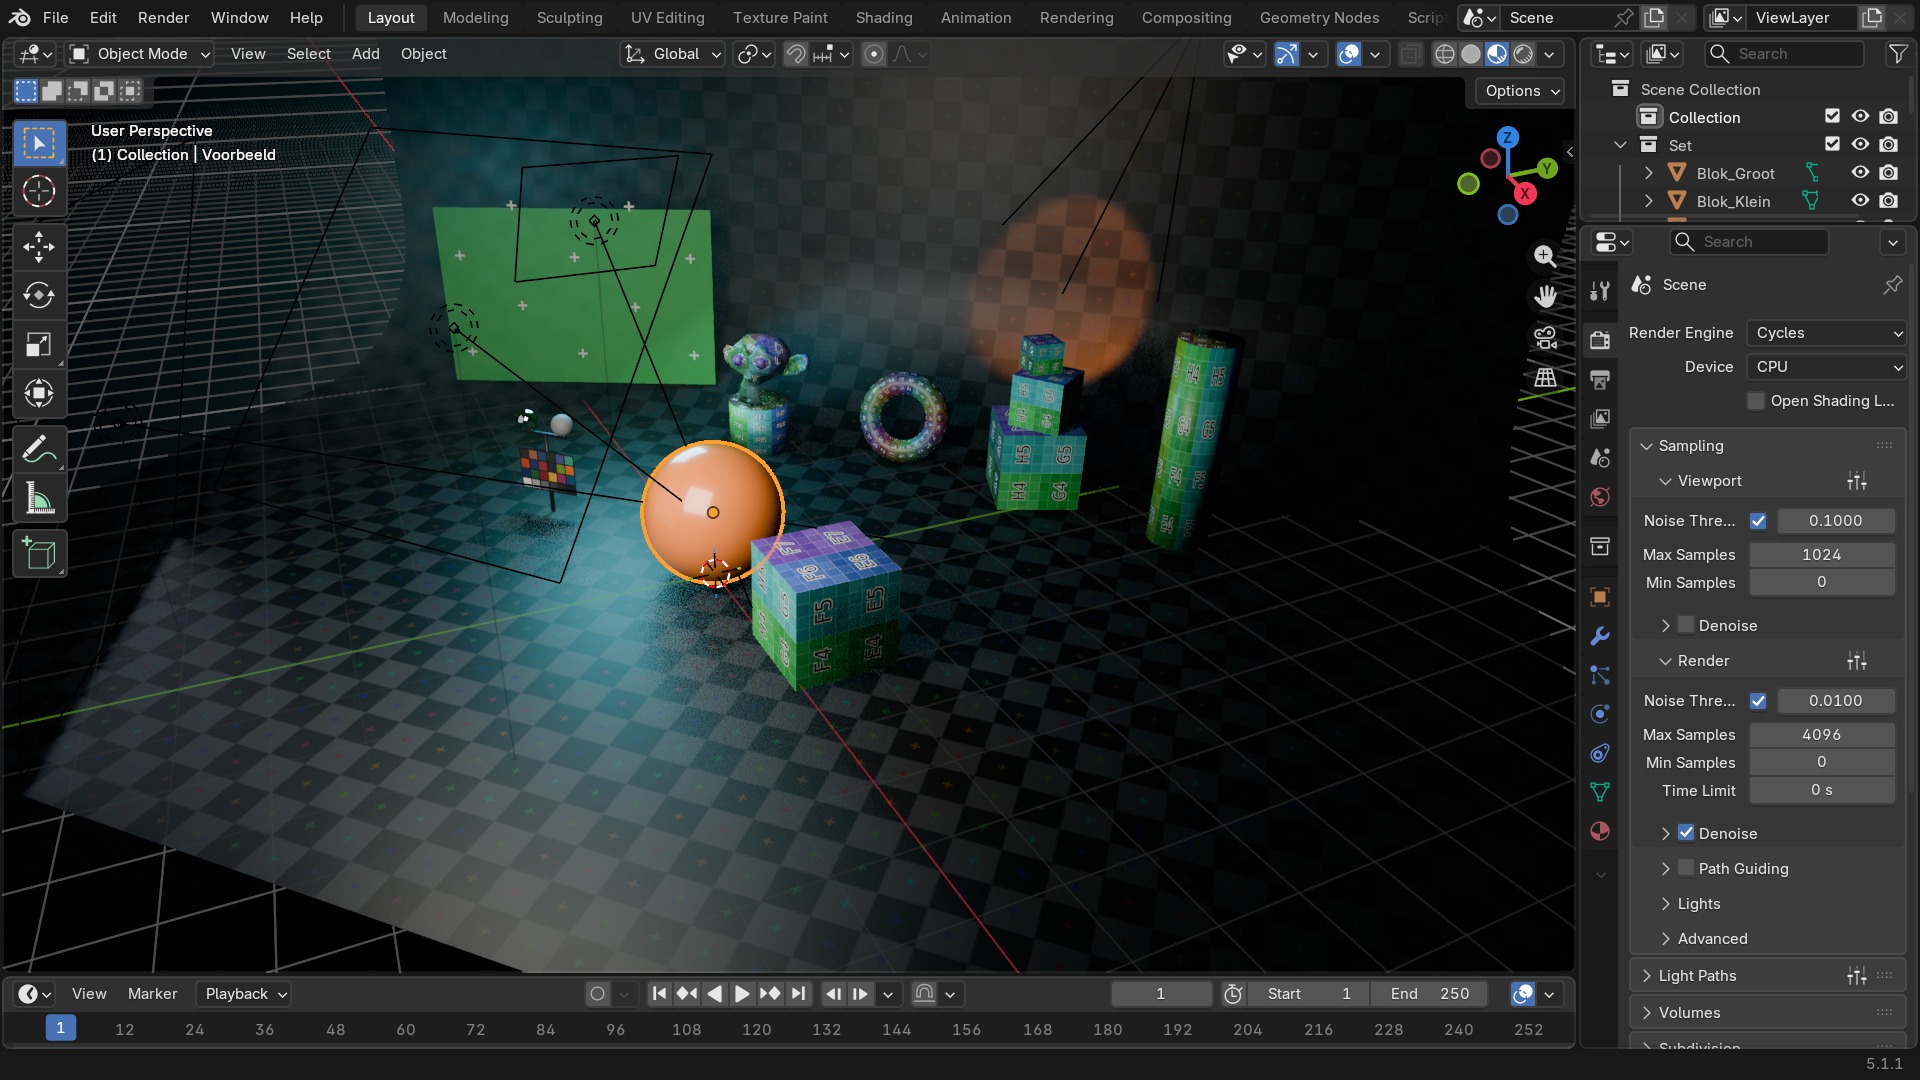
Cycles stuurt voor elke pixel één of meer denkbeeldige stralen de scène in, vanaf de camera. Raakt zo'n straal een oppervlak, dan kaatst hij verder af (volgens het materiaal: mat oppervlak strooit breed, glanzend oppervlak kaatst gericht) tot hij een lichtbron raakt — dan draagt die hele keten van kaatsen bij aan de kleur van de pixel — of tot hij te vaak gekaatst heeft en wordt afgekapt (zie Light Paths → Bounces). Omdat dit met willekeur werkt (elke straal kaatst een beetje anders), moet je véél stralen per pixel middelen voor een schoon beeld — dat is precies wat Samples regelt, en waarom te weinig samples ruis geeft.
 RECRENDER · EEVEE00:00:00:001280×720
 RECRENDER · EEVEE00:00:00:001280×720
 RECRENDER · EEVEE00:00:00:001280×720
 RECRENDER · EEVEE00:00:00:001280×720
 RECRENDER · EEVEE00:00:00:001280×720
Sampling: Noise Threshold en Adaptive Sampling
Samples → Render zet een bovengrens; met Adaptive Sampling aangevinkt stopt Cycles vroeger op plekken die al schoon genoeg zijn (een effen muur heeft veel minder samples nodig dan een glanzend, ruisgevoelig oppervlak) en blijft alleen doorrekenen waar het Noise Threshold nog niet gehaald is. Dat bespaart vaak veel tijd zonder zichtbaar kwaliteitsverlies. Min Samples zet een ondergrens zodat Cycles niet te vroeg stopt op een plek die toevallig al vlak oogt.
Los daarvan zet Viewport → Samples een apart, meestal veel lager plafond voor wat je live in de 3D-viewport ziet tijdens het werken — snelheid boven kwaliteit, met Noise Threshold ook hier instelbaar.
RECRENDER · EEVEE00:00:00:001280×720Denoising
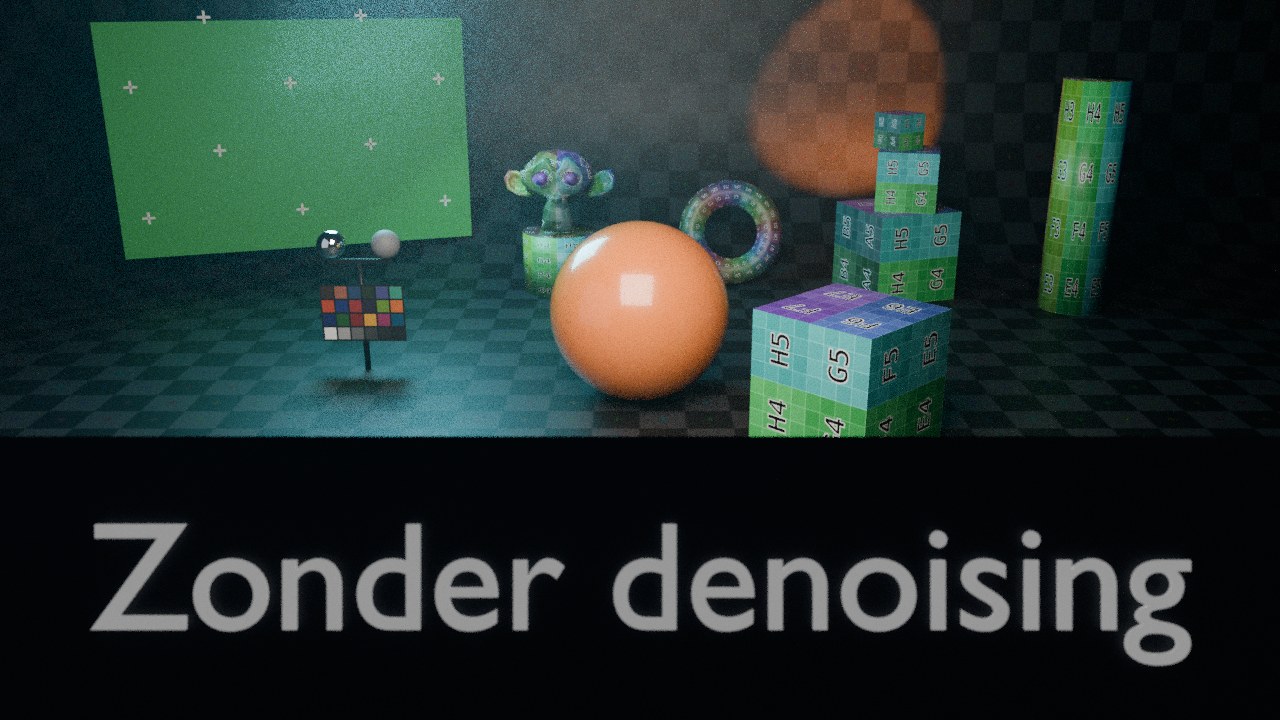
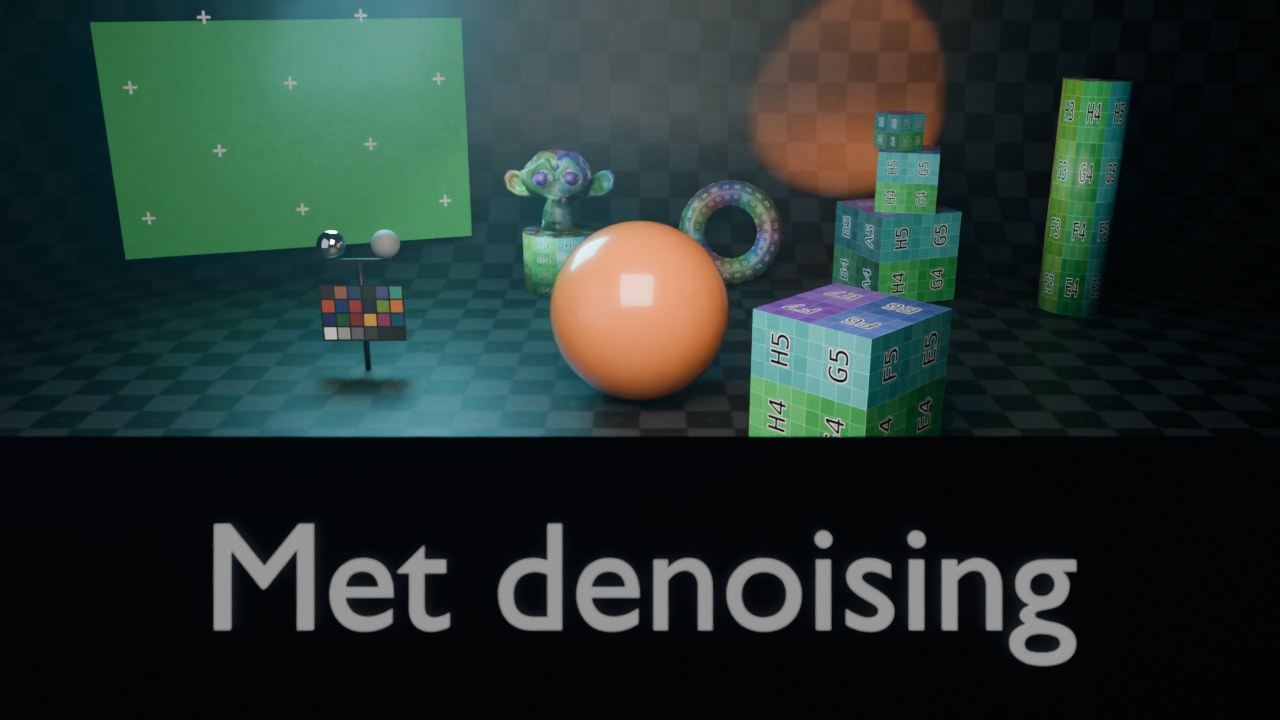
Denoising haalt resterende ruis uit een render weg met een beeldfilter of een AI-model, zodat je met minder samples toch een schoon resultaat krijgt. Denoiser kiest tussen OpenImageDenoise (Intel, CPU/GPU, meestal het scherpste resultaat) en OptiX (NVIDIA, sneller op een RTX-kaart). Passes bepaalt welke extra informatie (albedo, normalen) meegeleverd wordt aan de denoiser om beter onderscheid te maken tussen ruis en echte detailtextuur — meer passes geven een scherper resultaat maar kosten geheugen.
Denoising kan los ingesteld worden voor Viewport en voor de finale render, en werkt ook als losse compositor-node (Denoise, zie hoofdstuk 104) zodat je 'm kan toepassen ná andere compositing-stappen.
 RECRENDER · EEVEE00:00:00:001280×720
 RECRENDER · EEVEE00:00:00:001280×720
Light Paths: bounces en caustics
Light Paths bepaalt hoe vaak een straal mag kaatsen voor hij wordt afgekapt. Total zet de algemene bovengrens; daaronder verfijn je per type kaatsing: Diffuse (matte oppervlakken), Glossy (glanzende reflecties), Transmission (licht dat door glas of water gaat), Volume en Transparent. Meer bounces geven fysiek correctere resultaten (licht dat meerdere keren kaatst voor het een kamer verlicht) maar kosten meer tijd; te weinig bounces geven onnatuurlijk donkere hoeken en geen glas dat er goed doorheen laat kijken.
Caustics (de lichtvlekken die ontstaan als licht door glas of water gebroken wordt en zich ergens concentreert) staan default uit voor reflecterende caustics omdat ze traag zijn om ruisvrij te krijgen — zet ze gericht aan wanneer een shot ze echt nodig heeft.
RECRENDER · EEVEE00:00:00:001280×720Performance: tiles, GPU en Persistent Data
Cycles rendert op de Device: CPU of GPU Compute (in Preferences → System kies je de backend — CUDA/OptiX voor NVIDIA, HIP voor AMD, oneAPI voor Intel, Metal op macOS). Een GPU rendert een scène die in het videogeheugen past doorgaans veel sneller dan de CPU; Preferences → System laat je zelfs CPU en GPU tegelijk inzetten.
Performance → Threads regelt CPU-parallellisatie; Tile Size (in oudere documentatie, nu grotendeels automatisch beheerd) bepaalt in welke stukken het beeld gerenderd wordt — belangrijk bij weinig VRAM. Persistent Data houdt de scène tussen renders in het geheugen (handig bij een reeks renders met kleine wijzigingen, zoals een animatie), maar kost meer geheugen. Memory → Use Spatial Splits en verwante BVH-instellingen (de versnellingsstructuur waarmee Cycles snel bepaalt wat een straal raakt) zijn vooral relevant bij zeer zware scènes.
 RECBLENDER 5.1 · PROP-CYCLES-DEVICE00:00:00:001920×1080
Cycles — alle 105 instellingen
De volledige naslagtabel, rechtstreeks uit bpy.types.CyclesRenderSettings en verwante klassen uitgelezen: sampling, light paths, performance, denoising, GPU en meer.
| Instelling | Type | Standaard | Bereik | Wat hij doet (tooltip uit Blender) |
|---|---|---|---|---|
| Name | STRING | – | – | Unique name used in the code and scripting, can be re-defined in Python sub-classes if needed |
| Device | ENUM | CPU | CPU, GPU Compute | Device to use for rendering |
| Open Shading Language | BOOLEAN | uit | – | Use Open Shading Language |
| Pause Preview | BOOLEAN | uit | – | Pause all viewport preview renders |
| Use Denoising | BOOLEAN | aan | – | Denoise the rendered image |
| Denoiser | ENUM | Denoise the image with the selected denoiser. For denoising the image after rendering | ||
| Denoising Prefilter | ENUM | ACCURATE | None, Fast, Accurate | Prefilter noisy guiding (albedo and normal) passes to improve denoising quality when using OpenImageDenoise |
| Denoising Quality | ENUM | HIGH | High, Balanced, Fast | Overall denoising quality when using OpenImageDenoise |
| Denoising Input Passes | ENUM | RGB_ALBEDO_NORMAL | None, Albedo, Albedo and Normal | Passes used by the denoiser to distinguish noise from shader and geometry detail |
| Denoise on GPU | BOOLEAN | uit | – | Perform denoising on GPU devices configured in the system tab in the user preferences. This is significantly faster than on CPU, but requires additional GPU memory. When large scenes need more GPU memory, this option can be disabled |
| Use Viewport Denoising | BOOLEAN | uit | – | Denoise the image in the 3D viewport |
| Viewport Denoiser | ENUM | Denoise the image after each preview update with the selected denoiser | ||
| Viewport Denoising Prefilter | ENUM | FAST | None, Fast, Accurate | Prefilter noisy guiding (albedo and normal) passes to improve denoising quality when using OpenImageDenoise |
| Viewport Denoising Quality | ENUM | BALANCED | High, Balanced, Fast | Overall denoising quality when using OpenImageDenoise |
| Viewport Denoising Input Passes | ENUM | RGB_ALBEDO | None, Albedo, Albedo and Normal | Passes used by the denoiser to distinguish noise from shader and geometry detail |
| Start Denoising | INT | 1 | 0 – 16777216 | Sample to start denoising the preview at |
| Denoise Preview on GPU | BOOLEAN | aan | – | Perform denoising on GPU devices configured in the system tab in the user preferences. This is significantly faster than on CPU, but requires additional GPU memory. When large scenes need more GPU memory, this option can be disabled |
| Samples | INT | 4096 | 1 – 16777216 | Number of samples to render for each pixel |
| Viewport Samples | INT | 1024 | 1 – 16777216 | Number of samples to render in the viewport, unlimited if 0 |
| Use Sample Subset | BOOLEAN | uit | – | Render a subset of the specified max samples. Typically used for distributed rendering across multiple devices |
| Sample Subset Offset | INT | 0 | 0 – 16777216 | 0-based index of sample to start rendering from |
| Sample Subset Length | INT | 2048 | 1 – 16777216 | The number of samples to render in this subset |
| Time Limit | FLOAT | 0 | 0 – onbegrensd | Limit the render time (excluding synchronization time). Zero disables the limit |
| Sampling Pattern | ENUM | Random sampling pattern used by the integrator | ||
| Scrambling Distance | FLOAT | 1 | 0 – 1 | Reduce randomization between pixels to improve GPU rendering performance, at the cost of possible rendering artifacts if set too low |
| Scrambling Distance viewport | BOOLEAN | uit | – | Uses the Scrambling Distance value for the viewport. Faster but may flicker |
| Automatic Scrambling Distance | BOOLEAN | uit | – | Automatically reduce the randomization between pixels to improve GPU rendering performance, at the cost of possible rendering artifacts |
| Layer Samples | ENUM | USE | Use, Bounded, Ignore | How to use per view layer sample settings |
| Light Sampling Threshold | FLOAT | 0.01 | 0 – 1 | Probabilistically terminate light samples when the light contribution is below this threshold (more noise but faster rendering). Zero disables the test and never ignores lights |
| Use Adaptive Sampling | BOOLEAN | aan | – | Automatically reduce the number of samples per pixel based on estimated noise level |
| Adaptive Sampling Threshold | FLOAT | 0.01 | 0.001 – 1 | Noise level step to stop sampling at, lower values reduce noise at the cost of render time. Zero for automatic setting based on number of AA samples |
| Adaptive Min Samples | INT | 0 | 0 – 4096 | Minimum AA samples for adaptive sampling, to discover noisy features before stopping sampling. Zero for automatic setting based on noise threshold |
| Use Adaptive Sampling | BOOLEAN | aan | – | Automatically reduce the number of samples per pixel based on estimated noise level, for viewport renders |
| Adaptive Sampling Threshold | FLOAT | 0.1 | 0.001 – 1 | Noise level step to stop sampling at, lower values reduce noise at the cost of render time. Zero for automatic setting based on number of AA samples, for viewport renders |
| Adaptive Min Samples | INT | 0 | 0 – 4096 | Minimum AA samples for adaptive sampling, to discover noisy features before stopping sampling. Zero for automatic setting based on noise threshold, for viewport renders |
| Direct Light Sampling | ENUM | MULTIPLE_IMPORTANCE_SAMPLING | Multiple Importance Sampling, Forward Path Tracing, Next-Event Estimation | The type of strategy used for sampling direct light contributions |
| Light Tree | BOOLEAN | aan | – | Sample multiple lights more efficiently based on estimated contribution at every shading point |
| Min Light Bounces | INT | 0 | 0 – 1024 | Minimum number of light bounces. Setting this higher reduces noise in the first bounces, but can also be less efficient for more complex geometry like curves and volumes |
| Min Transparent Bounces | INT | 0 | 0 – 1024 | Minimum number of transparent bounces. Setting this higher reduces noise in the first bounces, but can also be less efficient for more complex geometry like curves and volumes |
| Reflective Caustics | BOOLEAN | aan | – | Use reflective caustics, resulting in a brighter image (more noise but added realism) |
| Refractive Caustics | BOOLEAN | aan | – | Use refractive caustics, resulting in a brighter image (more noise but added realism) |
| Filter Glossy | FLOAT | 1 | 0 – 10 | Adaptively blur glossy shaders after blurry bounces, to reduce noise at the cost of accuracy |
| Guiding | BOOLEAN | uit | – | Use path guiding for sampling paths. Path guiding incrementally learns the light distribution of the scene and guides path into directions with high direct and indirect light contributions |
| Deterministic | BOOLEAN | aan | – | Makes path guiding deterministic which means renderings will be reproducible with the same pixel values every time. This feature slows down training |
| Guiding Distribution Type | ENUM | PARALLAX_AWARE_VMM | Parallax-Aware VMM, Directional Quad Tree, VMM | Type of representation for the guiding distribution |
| Directional Sampling Type | ENUM | RIS | Diffuse Product MIS, Re-sampled Importance Sampling, Roughness-based | Type of the directional sampling used for guiding |
| Surface Guiding | BOOLEAN | aan | – | Use guiding when sampling directions on a surface |
| Surface Guiding Probability | FLOAT | 0.5 | 0 – 1 | The probability of guiding a direction on a surface |
| Volume Guiding | BOOLEAN | aan | – | Use guiding when sampling directions inside a volume |
| Training Samples | INT | 128 | 1 – onbegrensd | The maximum number of samples used for training path guiding. Higher samples lead to more accurate guiding, however may also unnecessarily slow down rendering once guiding is accurate enough. A value of 0 will continue training until the last sample |
| Volume Guiding Probability | FLOAT | 0.5 | 0 – 1 | The probability of guiding a direction inside a volume |
| Guide Direct Light | BOOLEAN | aan | – | Consider the contribution of directly visible light sources during guiding |
| Use MIS Weights | BOOLEAN | aan | – | Use the MIS weight to weight the contribution of directly visible light sources during guiding |
| Guiding Roughness Threshold | FLOAT | 0.05 | 0 – 1 | The minimal roughness value of a material to apply guiding |
| Max Bounces | INT | 12 | 0 – 1024 | Total maximum number of bounces |
| Diffuse Bounces | INT | 4 | 0 – 1024 | Maximum number of diffuse reflection bounces, bounded by total maximum |
| Glossy Bounces | INT | 4 | 0 – 1024 | Maximum number of glossy reflection bounces, bounded by total maximum |
| Transmission Bounces | INT | 12 | 0 – 1024 | Maximum number of transmission bounces, bounded by total maximum |
| Volume Bounces | INT | 0 | 0 – 1024 | Maximum number of volumetric scattering events |
| Transparent Max Bounces | INT | 8 | 0 – 1024 | Maximum number of transparent bounces. This is independent of maximum number of other bounces |
| Step Rate | FLOAT | 1 | 0.1 – 10 | Globally adjust detail for volume rendering, on top of automatically estimated step size. Higher values reduce render time, lower values render with more detail |
| Step Rate | FLOAT | 1 | 0.1 – 10 | Globally adjust detail for volume rendering, on top of automatically estimated step size. Higher values reduce render time, lower values render with more detail |
| Max Steps | INT | 1024 | 2 – 65536 | Maximum number of steps through the volume before giving up, to avoid extremely long render times with big objects or small step sizes |
| Biased | BOOLEAN | uit | – | Default volume rendering uses null scattering, which is unbiased and has less artifacts, but could be noisier. Biased option uses ray marching, with controls for steps size and max steps |
| Dicing Rate | FLOAT | 1 | 0.5 – 1000 | Multiplier for per object adaptive subdivision size |
| Viewport Dicing Rate | FLOAT | 8 | 0.5 – 1000 | Multiplier for per object adaptive subdivision size in the viewport |
| Max Subdivisions | INT | 12 | 0 – 16 | Stop subdividing when this level is reached even if the dicing rate would produce finer tessellation |
| Offscreen Dicing Scale | FLOAT | 4 | 1 – 25 | Multiplier for dicing rate of geometry outside of the camera view. The dicing rate of objects is gradually increased the further they are outside the camera view. Lower values provide higher quality reflections and shadows for off screen objects, while higher values use less memory |
| Exposure | FLOAT | 1 | 0 – 1024 | Image brightness scale |
| Transparent Glass | BOOLEAN | uit | – | Render transmissive surfaces as transparent, for compositing glass over another background |
| Transparent Roughness Threshold | FLOAT | 0.1 | 0 – 1 | For transparent transmission, keep surfaces with roughness above the threshold opaque |
| Filter Type | ENUM | BLACKMAN_HARRIS | Box, Gaussian, Blackman-Harris | Pixel filter type |
| Filter Width | FLOAT | 1.5 | 0.01 – 10 | Pixel filter width |
| Seed | INT | 0 | 0 – onbegrensd | Seed value for integrator to get different noise patterns |
| Use Animated Seed | BOOLEAN | uit | – | Use different seed values (and hence noise patterns) at different frames |
| Clamp Direct | FLOAT | 0 | 0 – 100000000 | If non-zero, the maximum value for a direct sample, higher values will be scaled down to avoid too much noise and slow convergence at the cost of accuracy |
| Clamp Indirect | FLOAT | 10 | 0 – 100000000 | If non-zero, the maximum value for an indirect sample, higher values will be scaled down to avoid too much noise and slow convergence at the cost of accuracy |
| Viewport BVH Type | ENUM | DYNAMIC_BVH | Dynamic BVH, Static BVH | Choose between faster updates, or faster render |
| Use Spatial Splits | BOOLEAN | uit | – | Use BVH spatial splits: longer builder time, faster render |
| Use Curves BVH | BOOLEAN | aan | – | Use special type BVH optimized for curves (uses more ram but renders faster) |
| Use Compact BVH | BOOLEAN | uit | – | Use compact BVH structure (uses less ram but renders slower) |
| BVH Time Steps | INT | 0 | 0 – 16 | Split BVH primitives by this number of time steps to speed up render time in cost of memory |
| Bake Type | ENUM | COMBINED | Combined, Ambient Occlusion, Shadow, Position, Normal, UV, Roughness, Emission, Environment, Diffuse, Glossy, Transmission | Type of pass to bake |
| Use Camera Cull | BOOLEAN | uit | – | Allow objects to be culled based on the camera frustum |
| Camera Cull Margin | FLOAT | 0.1 | 0 – 5 | Margin for the camera space culling |
| Use Distance Cull | BOOLEAN | uit | – | Allow objects to be culled based on the distance from camera |
| Cull Distance | FLOAT | 50 | 0 – onbegrensd | Cull objects which are further away from camera than this distance |
| Shutter Type | ENUM | NONE | None, Top-Bottom | Type of rolling shutter effect matching CMOS-based cameras |
| Rolling Shutter Duration | FLOAT | 0.1 | 0 – 1 | Scanline "exposure" time for the rolling shutter effect |
| Viewport Texture Limit | ENUM | OFF | No Limit, 128, 256, 512, 1024, 2048, 4096, 8192 | Limit texture size used by viewport rendering |
| Render Texture Limit | ENUM | OFF | No Limit, 128, 256, 512, 1024, 2048, 4096, 8192 | Limit texture size used by final rendering |
| Fast GI Approximation | BOOLEAN | uit | – | Approximate diffuse indirect light with background tinted ambient occlusion. This provides fast alternative to full global illumination, for interactive viewport rendering or final renders with reduced quality |
| Fast GI Method | ENUM | REPLACE | Replace, Add | Fast GI approximation method |
| AO Bounces | INT | 1 | 0 – 1024 | After this number of light bounces, use approximate global illumination. 0 disables this feature |
| AO Bounces Render | INT | 1 | 0 – 1024 | After this number of light bounces, use approximate global illumination. 0 disables this feature |
| Auto Tile | BOOLEAN | aan | – | Deprecated, tiling is always enabled |
| Tile Size | INT | 2048 | 8 – 8192 | Render high resolution images in tiles of this size, to reduce memory usage. Tiles are cached to disk while rendering to save memory |
| AVX2 | BOOLEAN | aan | – | |
| SSE42 | BOOLEAN | aan | – | |
| BVH Layout | ENUM | EMBREE | BVH2, Embree | |
| Adaptive Compile | BOOLEAN | uit | – | Compile the Cycles GPU kernel with only the feature set required for the current scene |
| OptiX Module Debug | BOOLEAN | uit | – | Load OptiX module in debug mode: lower logging verbosity level, enable validations, and lower optimization level |
| Adaptive Compile | BOOLEAN | uit | – | Compile the Cycles GPU kernel with only the feature set required for the current scene |
| Adaptive Compile | BOOLEAN | uit | – | Compile the Cycles GPU kernel with only the feature set required for the current scene |
Zelf proberen: samples en denoising afwegen
Open start_cycles_samples.blend: een scène met een glazen object en een glanzende vloer (ruisgevoelig). Zoek de laagste samplewaarde die met denoising nog een schoon resultaat geeft.
- 1Render op 32 samples zonder denoising, bekijk de ruis in de glazen randen.
- 2Zet Denoising aan (OpenImageDenoise) en render opnieuw op dezelfde 32 samples.
- 3Zet Adaptive Sampling aan met Noise Threshold 0.01, laat Samples oplopen tot 1024, en vergelijk rendertijd en resultaat.
- 4Noteer welke combinatie de beste verhouding tussen rendertijd en kwaliteit geeft voor deze scène.