Hoofdstuk 76Grease Pencil
Tekenen, lagen, materialen en modifiers voor 2D-in-3D-animatie
Grease Pencil is Blenders 2D-tekensysteem dat vólledig in de 3D-ruimte leeft: strokes bestaan uit punten met dikte en kleur, georganiseerd in lagen, en kunnen net als een mesh modifiers, materialen en zelfs physics krijgen.
 RECCONCEPT00:00:00:00schoolium
Wat is Grease Pencil?
Shift+A > Grease Pencil voegt een GP-object toe: in plaats van vertices/edges/faces bestaat de data uit strokes, elk een reeks punten met een eigen dikte, druk en kleur. Omdat het object toch een gewoon 3D-object is, kan je er doorheen lopen met een camera, het in perspectief tekenen, en het met dezelfde transform-gereedschappen verplaatsen als elk ander object.
Gebruikt voor storyboards, 2D-animatie die zich in een 3D-scène afspeelt, annotaties, en concept-lijntekeningen boven op een 3D-model.
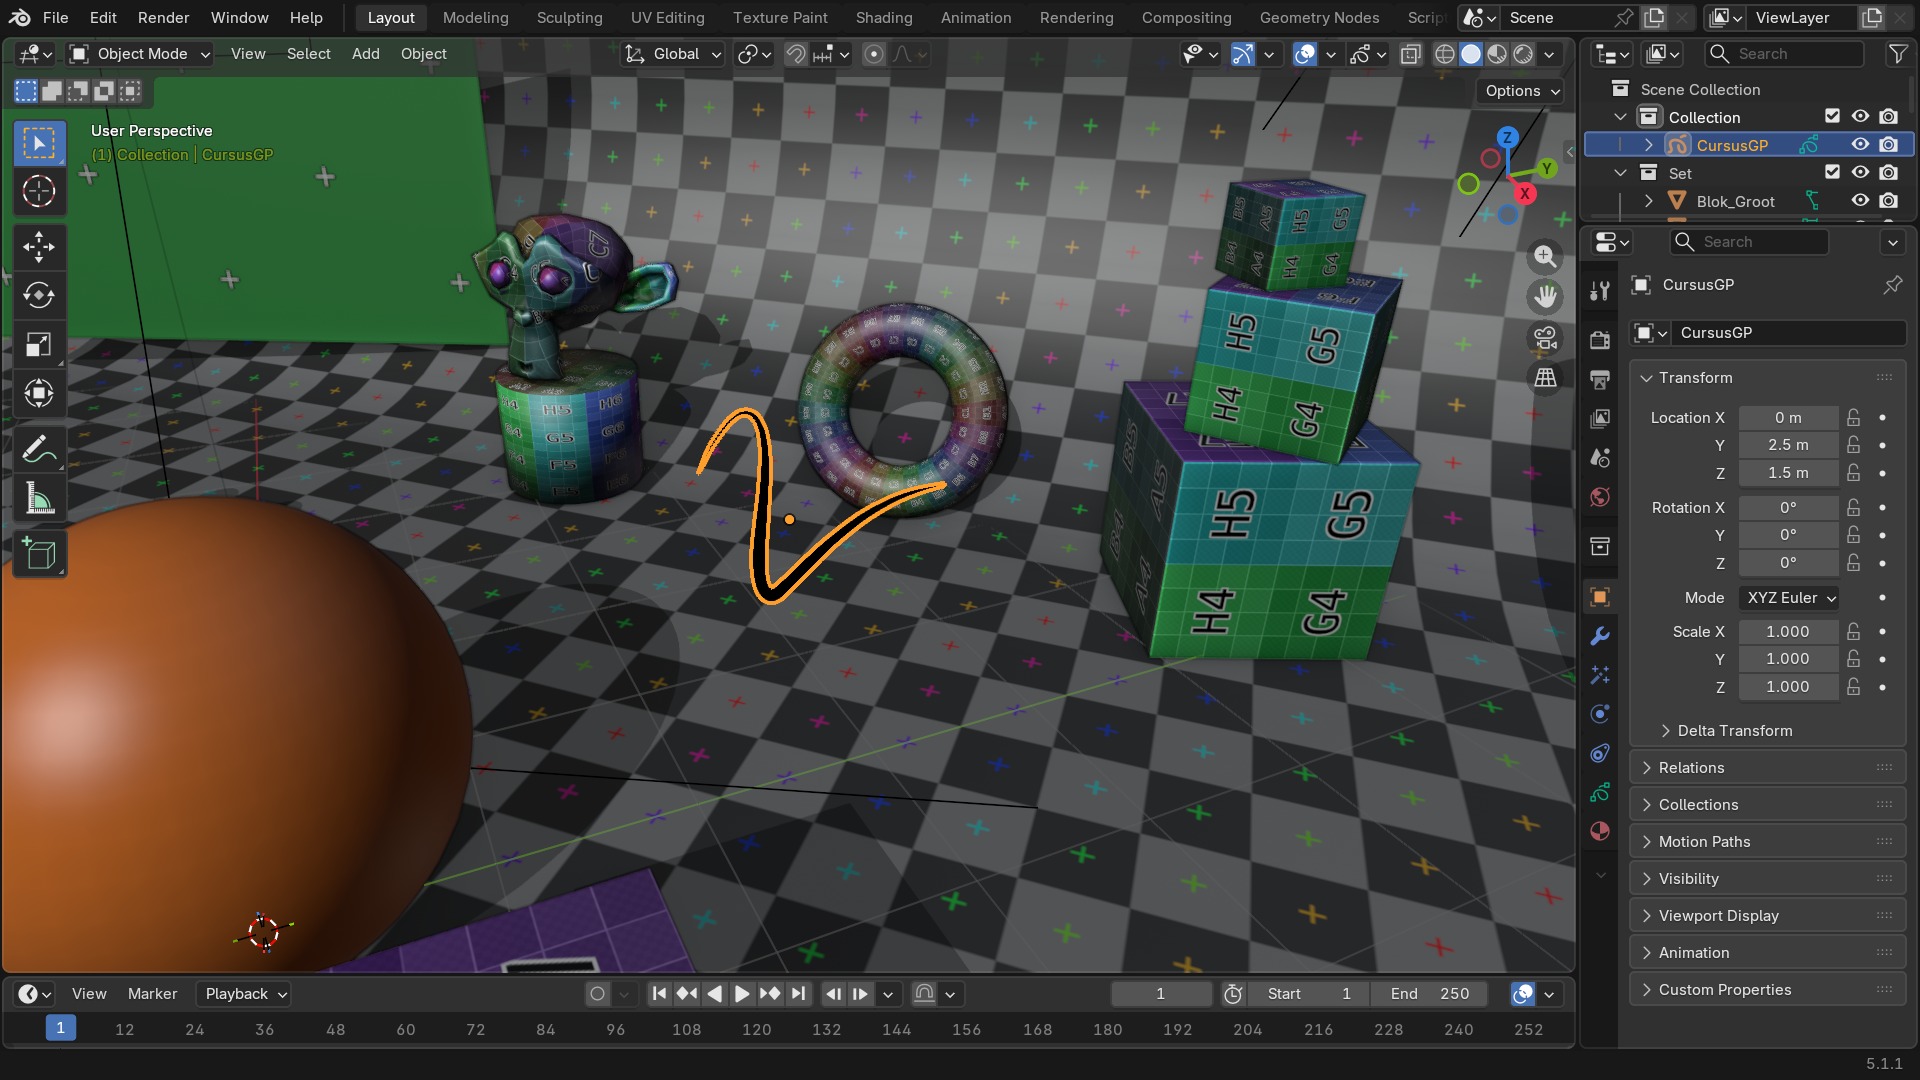 RECBLENDER 5.1 · F76-GP-OBJECT00:00:00:001920×1080
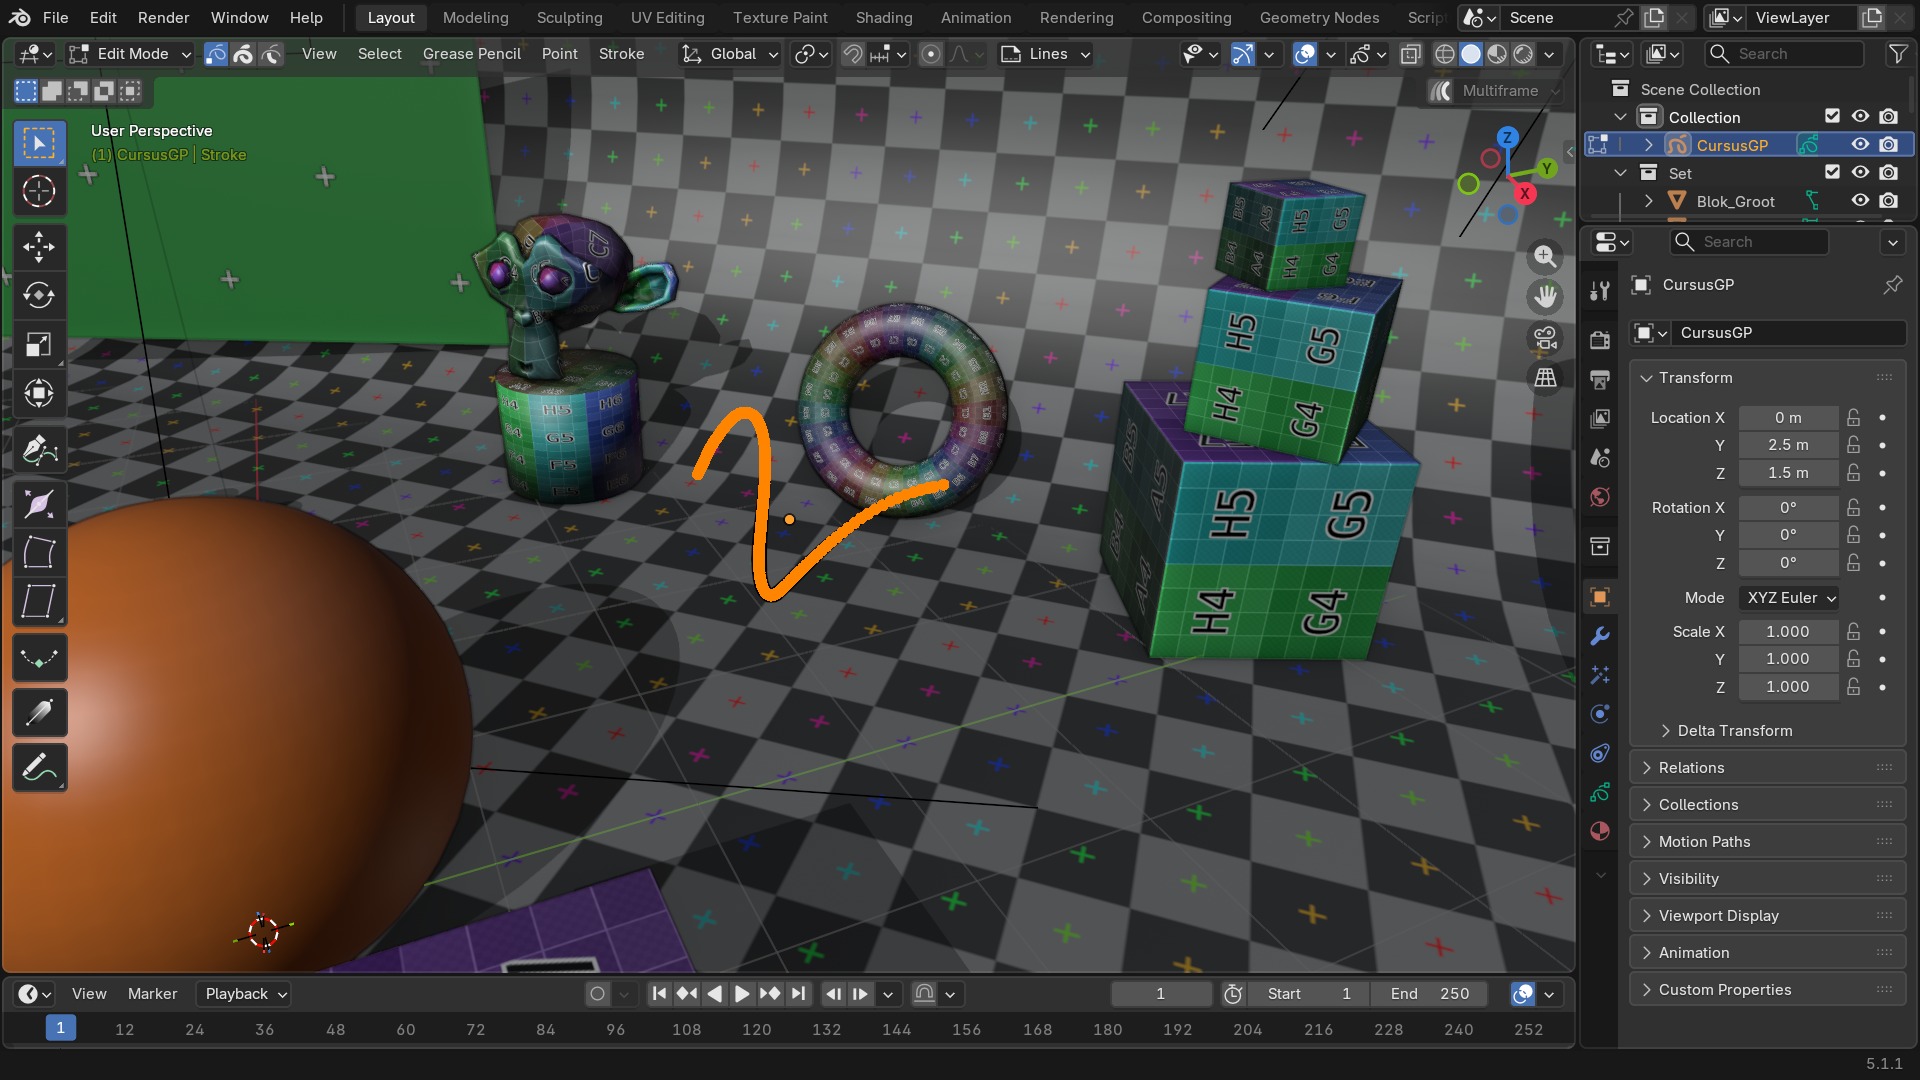
De Draw Mode-header
Sneltoetsen — Grease Pencil (Draw Mode)
| Toets | Actie | Operator |
|---|---|---|
| U | Active Material | wm.call_menu |
| Y | Change Active Layer | wm.call_menu |
| Alt+H | Show All Layers | grease_pencil.layer_reveal |
| H | Hide Layer(s) | grease_pencil.layer_hide |
| Shift+H | Hide Layer(s) | grease_pencil.layer_hide |
| X | Swap Colors | paint.brush_colors_flip |
| Shift+X | Sample Color | paint.sample_color |
| NUMPAD_ASTERIX | Isolate Layers | grease_pencil.layer_isolate |
| I | Animation | wm.call_menu |
| Shift+I | Insert Blank Frame | grease_pencil.insert_blank_frame |
| Shift+DEL | Delete Frame | grease_pencil.delete_frame |
| Alt+I | Delete | wm.call_menu |
| Ctrl+Shift+M | Merge | grease_pencil.layer_merge |
| Ctrl+E | Grease Pencil Interpolation | grease_pencil.interpolate |
| Ctrl+Shift+E | Interpolate Sequence | grease_pencil.interpolate_sequence |
| Ctrl+Alt+RIGHTMOUSE | Grease Pencil Erase Lasso | grease_pencil.erase_lasso |
| B | Grease Pencil Box Erase | grease_pencil.erase_box |
| F | Radial Control | wm.radial_control |
| Shift+F | Radial Control | wm.radial_control |
| Shift+SPACE | Call Asset Shelf Popover | wm.call_asset_shelf_popover |
| RIGHTMOUSE | Draw | wm.call_panel |
| APP | Draw | wm.call_panel |
Tekenen: brushes en stroke placement
De Draw-, Erase-, Tint- en Fill-tools werken net als de Sculpt-brushes uit hoofdstuk 75, maar dan om lijnen te trekken in plaats van een mesh te vervormen. De Stroke Placement-dropdown bepaalt in welk vlak nieuwe punten belanden: 3D Cursor (een vast vlak door de cursor), Surface (strokes plakken op het dichtstbijzijnde 3D-oppervlak), View (altijd recht voor de camera, een klassieke 2D-tekenlaag) of Origin (het vlak door de object-origin).
RECBLENDER 5.1 · F76-DRAW-MODE-HEADER00:00:00:001920×1080Lagen
Het Layers-paneel werkt zoals in een 2D-tekenprogramma: elke laag heeft een eigen zichtbaarheid, dekking, blend mode en vergrendeling, en lagen boven elkaar bepalen de tekenvolgorde. Onion Skinning toont vorige en volgende frames doorschijnend mee terwijl je tekent — onmisbaar bij frame-voor-frame 2D-animatie om de beweging vloeiend te houden.
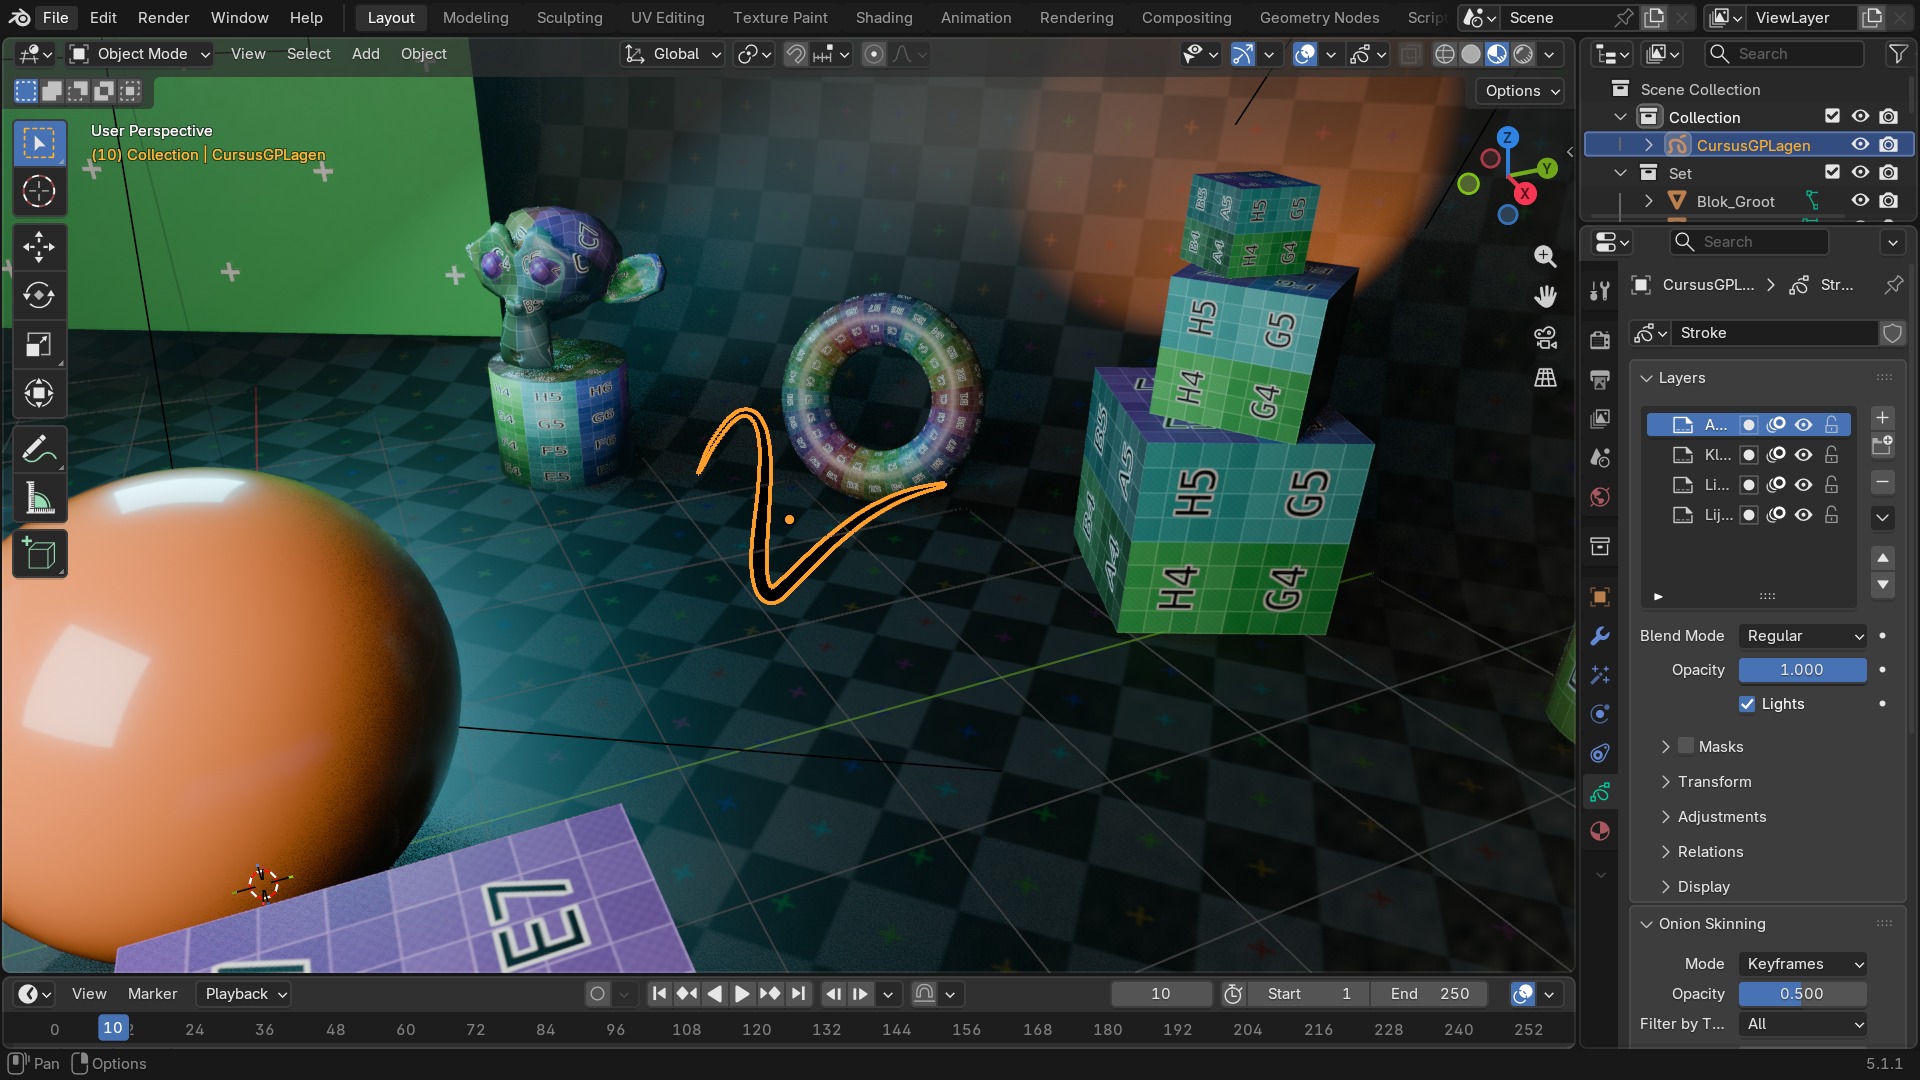 RECBLENDER 5.1 · F76-LAYERS-ONION00:00:00:001920×1080
Tool Settings — Grease Pencil
| Instelling | Type | Standaard | Bereik | Wat hij doet (tooltip uit Blender) |
|---|---|---|---|---|
| Use Additive Drawing | BOOLEAN | uit | – | When creating new frames, the strokes from the previous/active frame are included as the basis for the new one |
| Draw Strokes on Back | BOOLEAN | uit | – | New strokes are drawn below of all strokes in the layer |
| Compact List | BOOLEAN | aan | – | Show compact list of colors instead of thumbnails |
| Add weight data for new strokes | BOOLEAN | uit | – | Weight data for new strokes is added according to the current vertex group and weight. If no vertex group selected, weight is not added. |
| Automerge | BOOLEAN | uit | – | Join the last drawn stroke with previous strokes in the active layer by distance |
| Stroke Placement (3D View) | ENUM | ORIGIN | Origin, 3D Cursor, Surface, Stroke | |
| Stroke Snap | ENUM | NONE | All Points, End Points, First Point | |
| Surface Offset | FLOAT | 0.15 | 0 – 1 | Offset along the normal when drawing on surfaces |
| Project Onto Selected | BOOLEAN | uit | – | Project the strokes only onto selected objects |
| Select Mode | ENUM | POINT | Point, Stroke, Segment | |
| Selection Mask | BOOLEAN | uit | – | Only sculpt selected stroke points |
| Selection Mask | BOOLEAN | uit | – | Only sculpt selected strokes |
| Selection Mask | BOOLEAN | uit | – | Only sculpt selected stroke points between other strokes |
| Selection Mask | BOOLEAN | uit | – | Only paint selected stroke points |
| Selection Mask | BOOLEAN | uit | – | Only paint selected strokes |
| Selection Mask | BOOLEAN | uit | – | Only paint selected stroke points between other strokes |
Materialen: Stroke en Fill
Een GP-materiaal heeft twee onderdelen: Stroke (de kleur en dikte van de lijn zelf, met een optionele Style zoals Dots of Squares in plaats van een vaste lijn) en Fill (de kleur die het gesloten gebied binnen een stroke opvult, effen of als gradient). Beide kan je apart aan- of uitzetten per materiaal, zodat je bijvoorbeeld een materiaal met enkel Fill (silhouetten) kan afwisselen met een materiaal met enkel Stroke (schetslijnen).
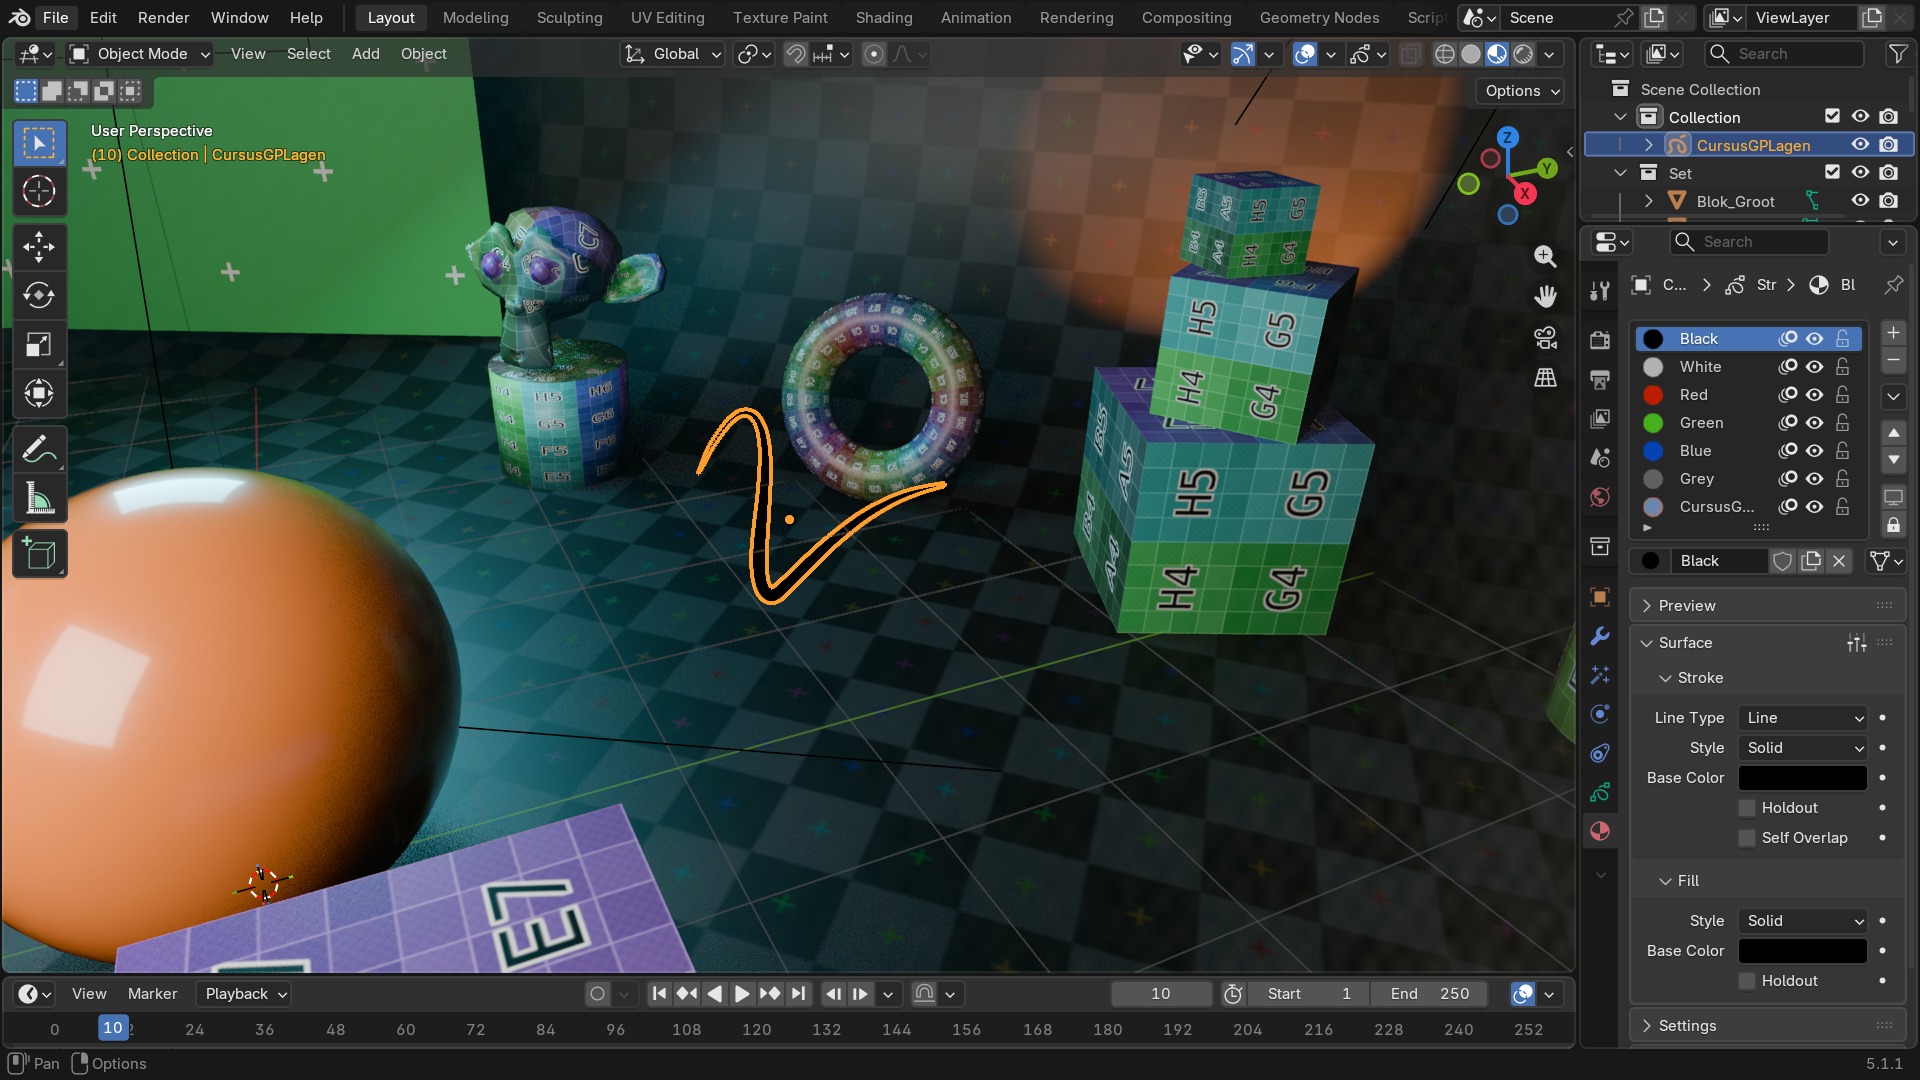 RECBLENDER 5.1 · F76-MATERIAAL-STROKE-FILL00:00:00:001920×1080
Lagen en onion skinning
Edit Mode voor Grease Pencil
Net als bij een mesh kan je Tab drukken om de punten van bestaande strokes te selecteren en te bewerken: verplaatsen, roteren, schalen, of Simplify om overtollige punten uit een te druk getekende lijn te halen. Select Mask-opties (Point/Stroke/Segment) bepalen op welk niveau een klik selecteert, vergelijkbaar met de Vertex/Edge/Face-keuze bij een gewoon mesh.
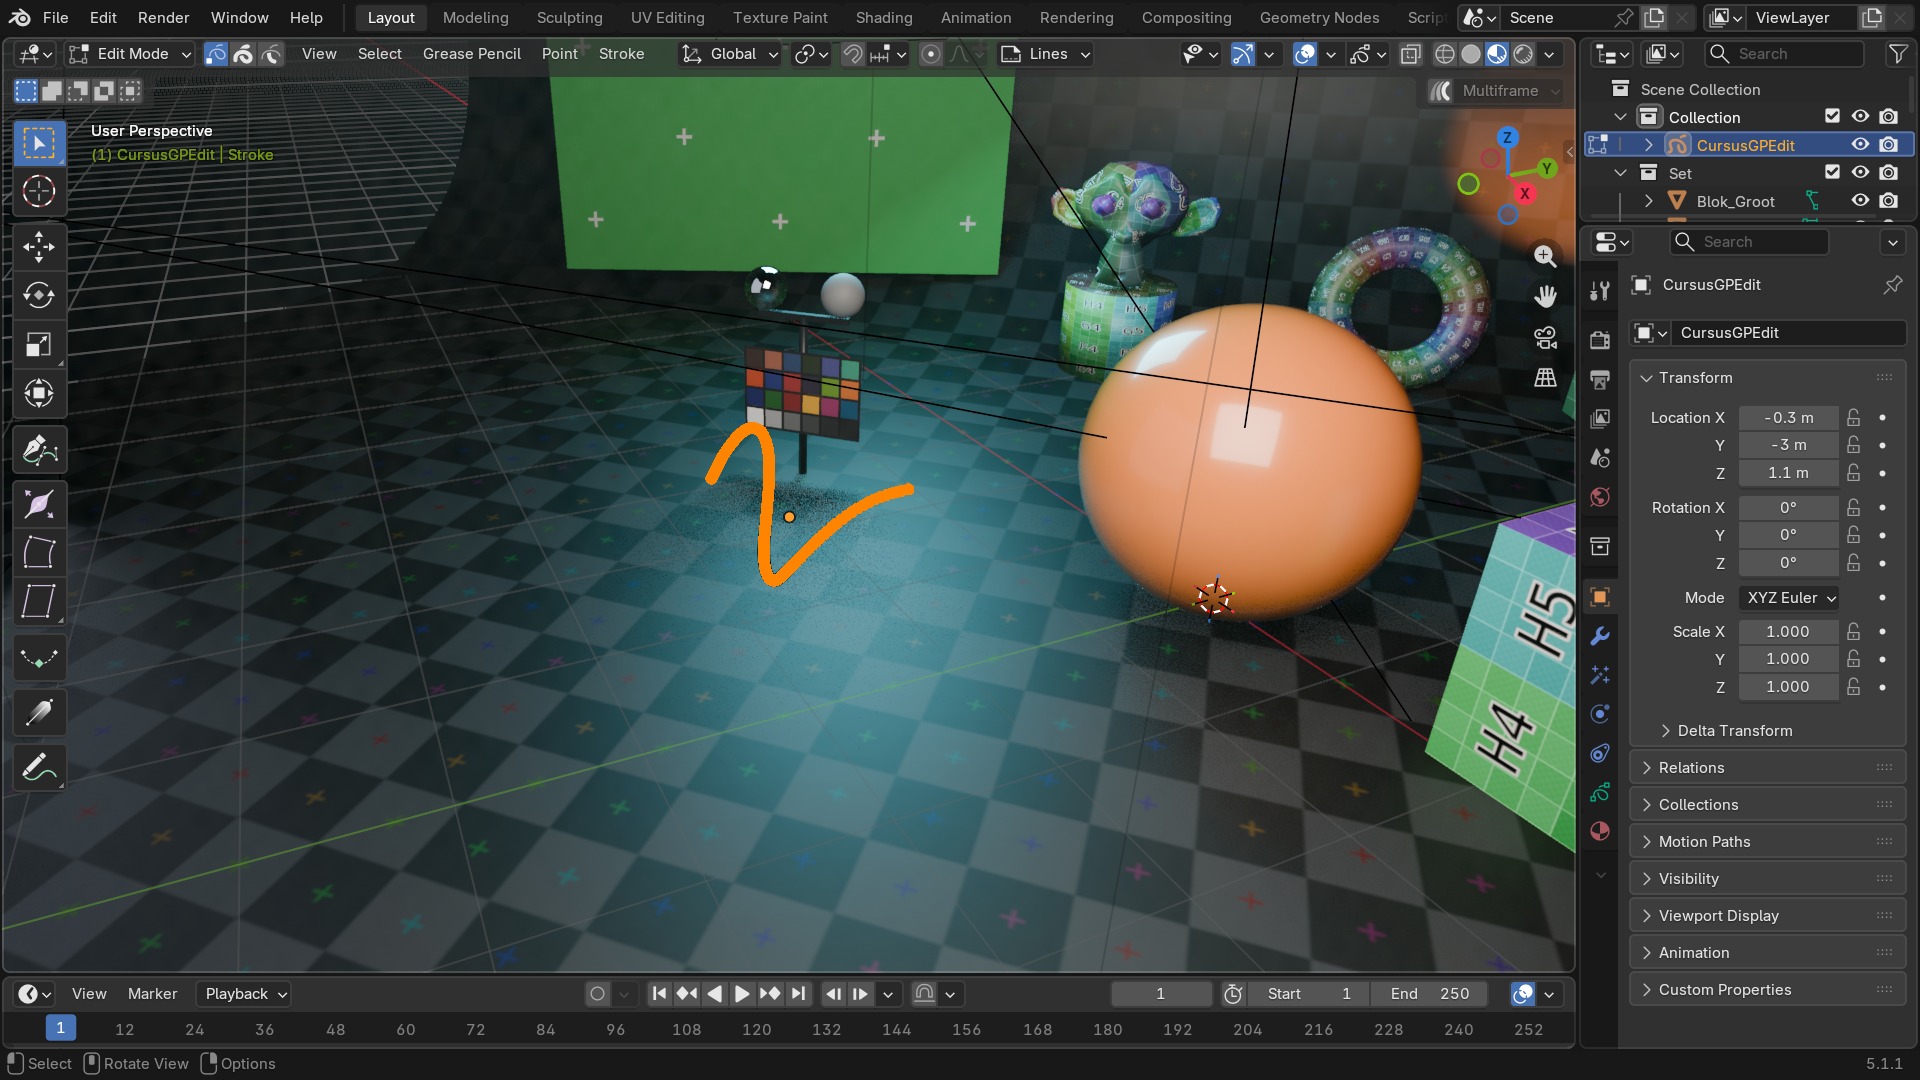 RECBLENDER 5.1 · F76-EDIT-MODE00:00:00:001920×1080
Sculpt, Vertex Paint en Weight Paint voor GP
Grease Pencil heeft zijn eigen varianten van drie modi die je al van meshes kent: Sculpt Mode (Smooth/Thickness/Strength-brushes die strokes vervormen in plaats van vertices), Vertex Paint (kleur direct over bestaande strokes heen schilderen, los van het materiaal) en Weight Paint (gewichten voor een Armature-modifier, net als bij een mesh-rig). Telkens dezelfde onderliggende logica, toegepast op punten in plaats van vertices.
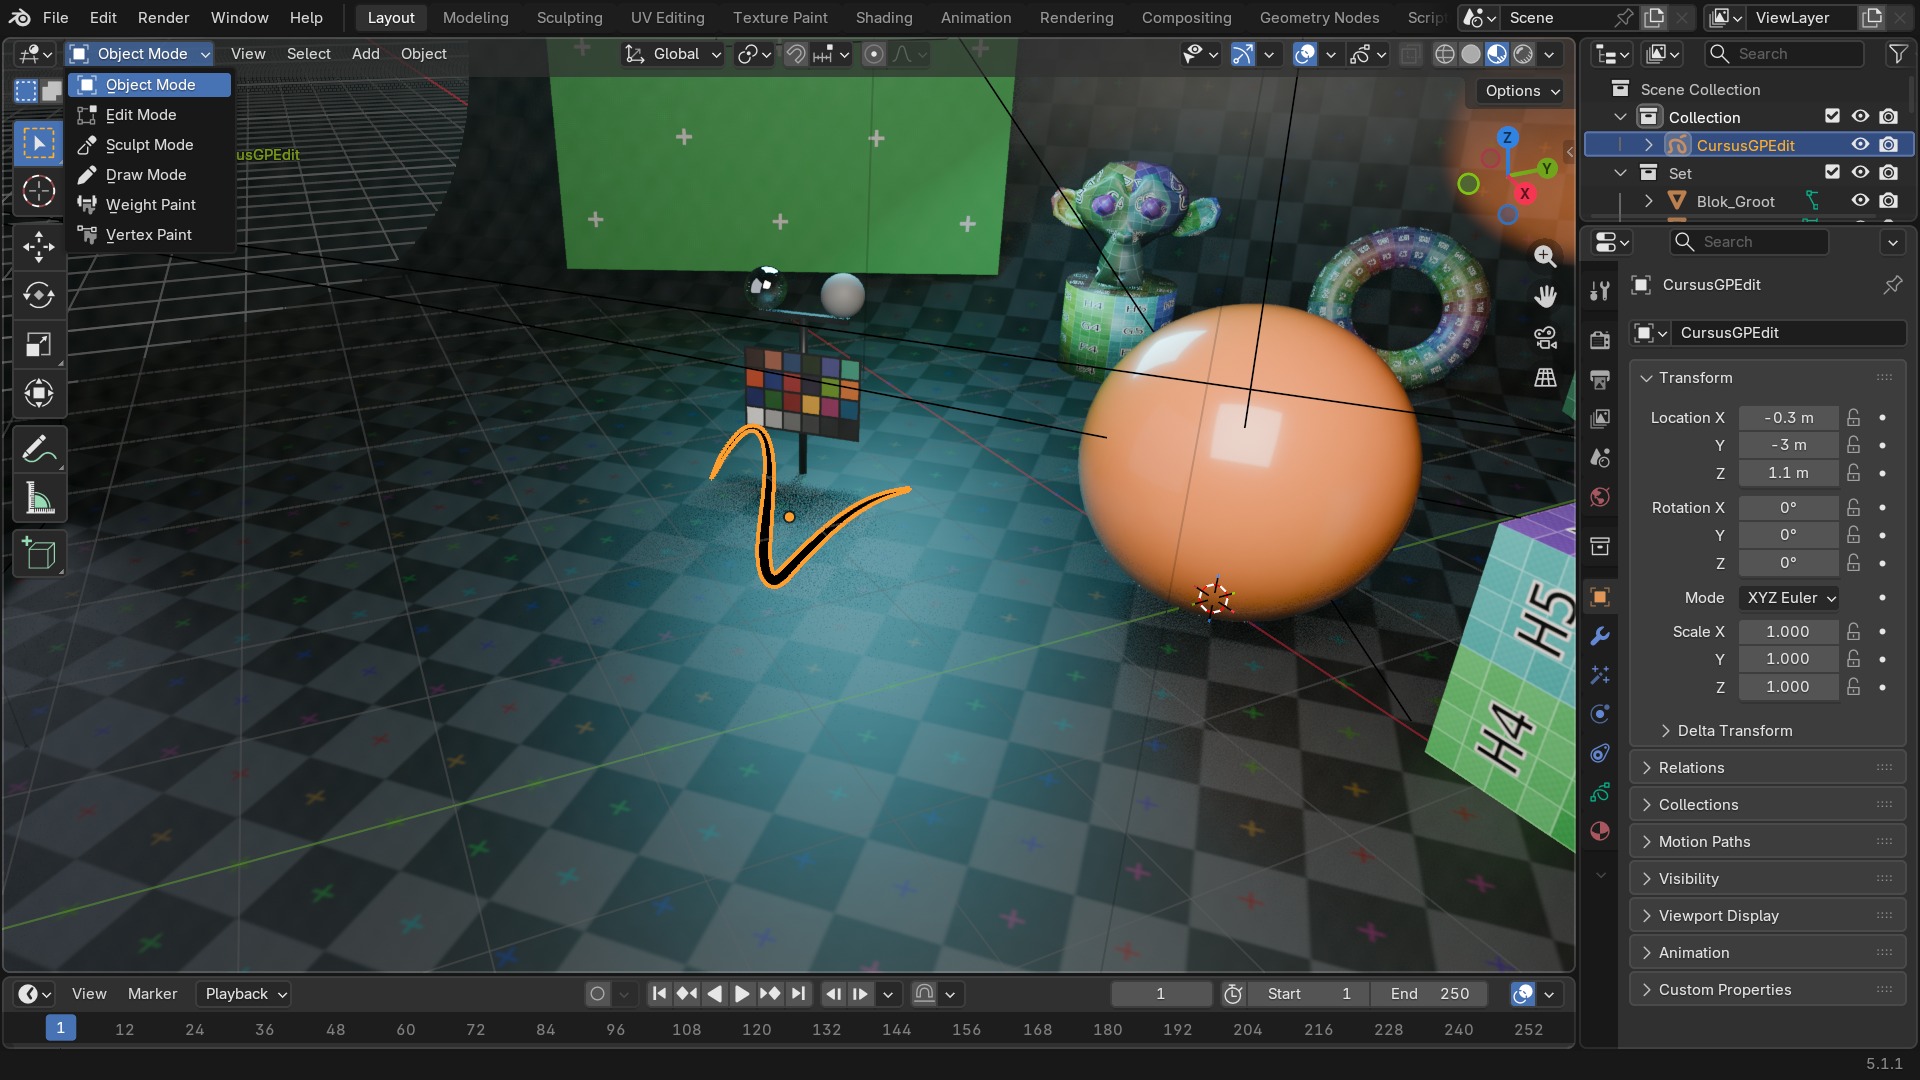 RECBLENDER 5.1 · F76-MODE-DROPDOWN00:00:00:001920×1080
De GP Modifier Properties-tab
- 1Add Modifier
Zelfde soort menu als bij een mesh, maar met de 26 GP-eigen modifiers.
- 2Layer / Material-filter
De meeste GP-modifiers werken optioneel maar op één gekozen laag of materiaal in plaats van het hele object.
- 3Apply
Zet het resultaat vast in de strokes zelf, net als bij een mesh-modifier.
Grease Pencil-modifiers: een eigen stack
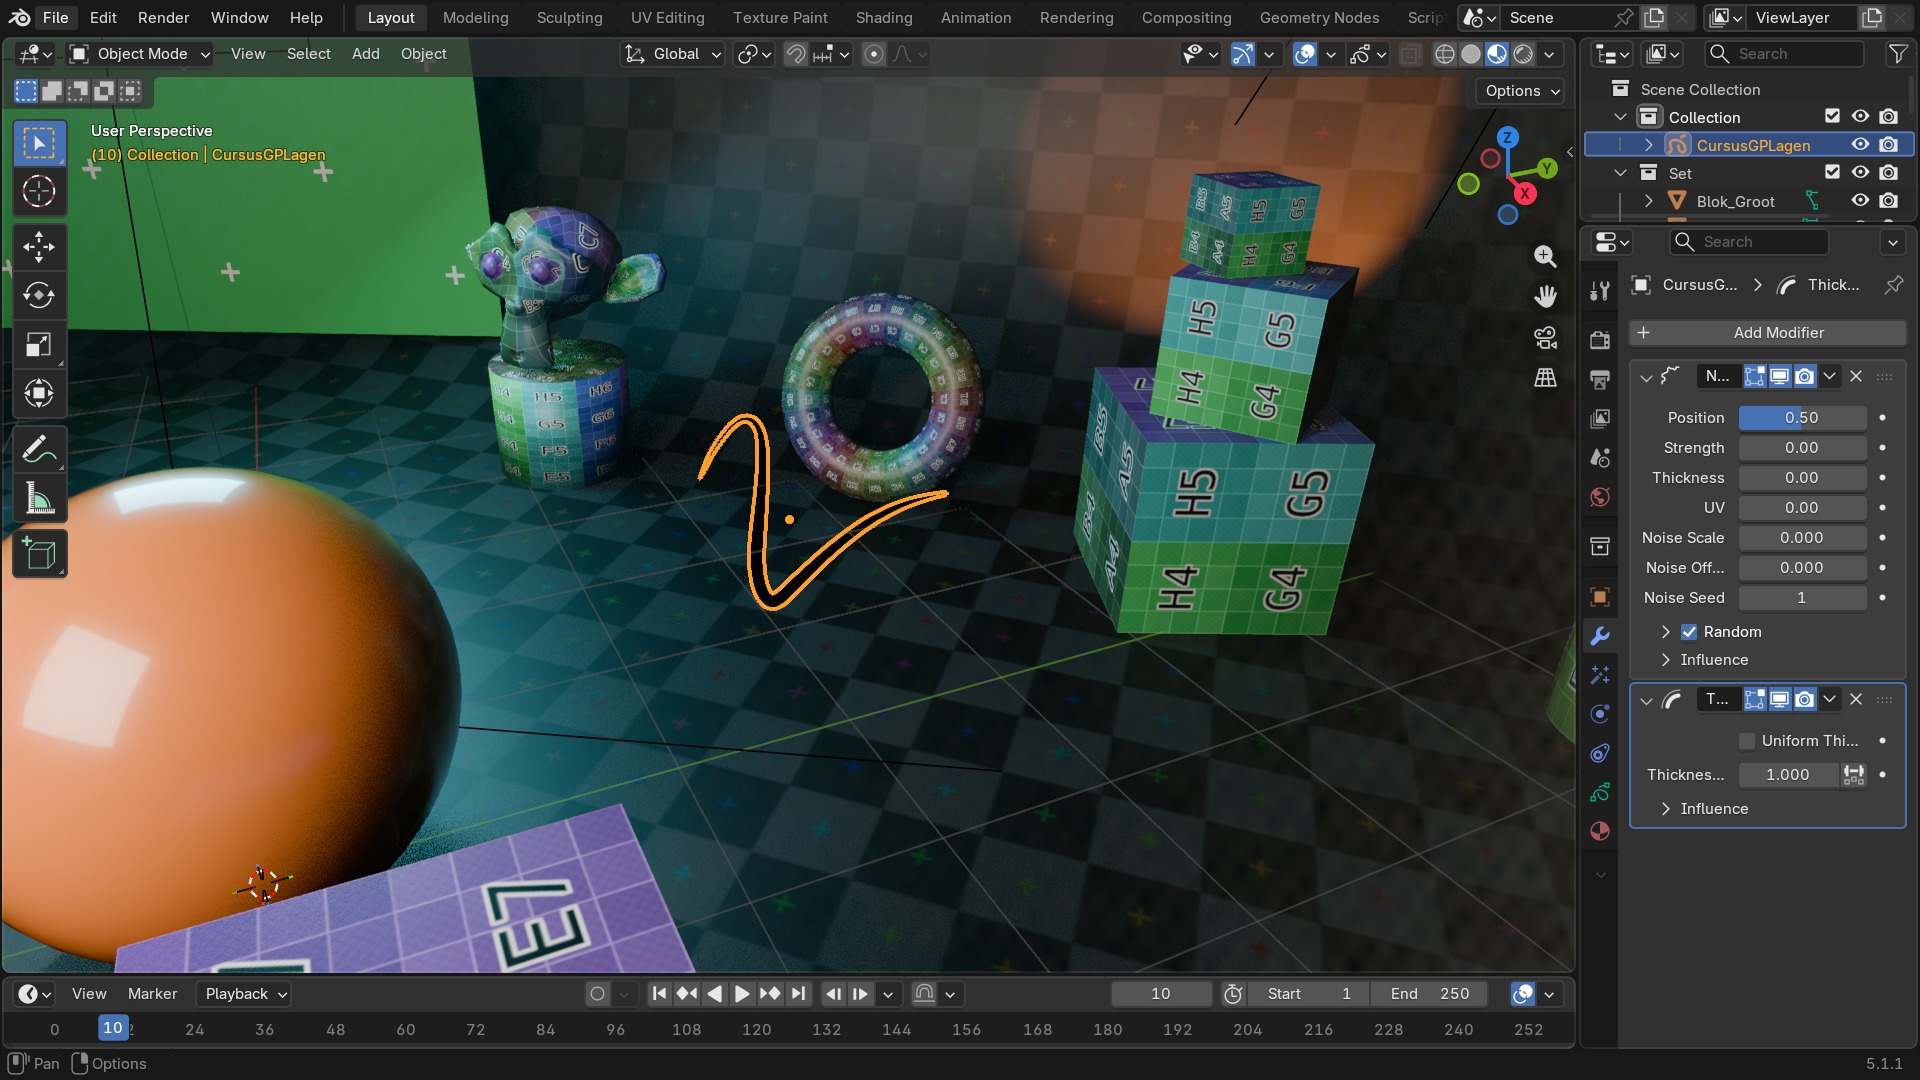
Ook een GP-object heeft een Modifier Properties-tab met een eigen stack, los van de 57 mesh-modifiers uit hoofdstuk 71 — de onderliggende data is te verschillend (strokes met dikte en druk, geen vertices/faces) om dezelfde modifiers te delen. Wel is de geest identiek: niet-destructief, herordenbaar, en met Apply om definitief vast te zetten.
RECBLENDER 5.1 · F76-MODIFIER-STACK00:00:00:001920×1080Generate — vorm en herhaling
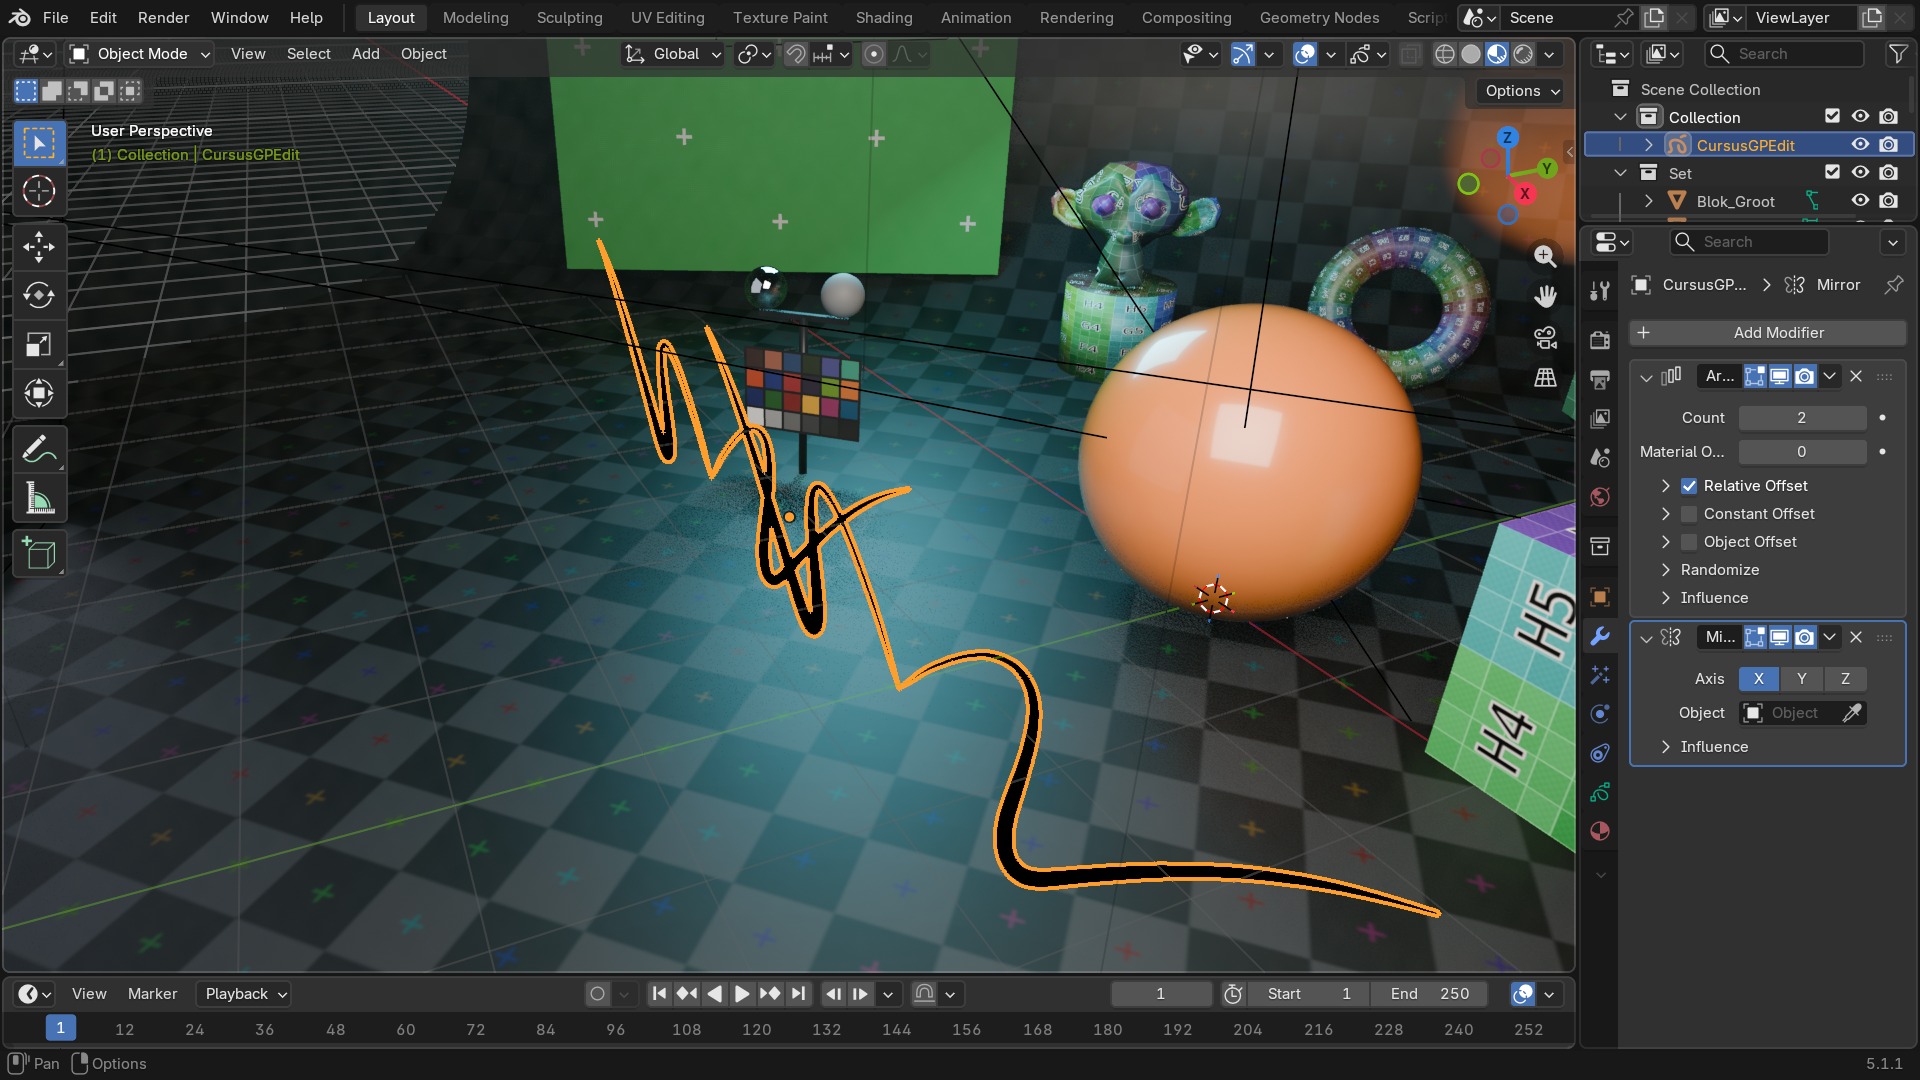
Elf modifiers die het aantal of de vorm van strokes veranderen: van Array en Mirror (herhalen/spiegelen) tot Line Art, dat strokes rechtstreeks uit de 3D-scène genereert. Net als bij de mesh-Generate-categorie voegen deze modifiers structureel iets toe aan wat er al getekend staat.
 RECBLENDER 5.1 · F76-GENERATE-MODIFIERS00:00:00:001920×1080
Array · Build · Dot Dash
Array — Herhaalt geselecteerde strokes in een array, met een offset per kopie en optionele willekeurige variatie in schaal en rotatie — dezelfde geest als de mesh-Array, maar dan voor strokes: bladeren op een tak, een herhaald rasterpatroon, een rij identieke getekende symbolen.
| Instelling | Type | Standaard | Bereik | Wat hij doet (tooltip uit Blender) |
|---|---|---|---|---|
| Apply on Spline | BOOLEAN | uit | – | Apply this and all preceding deformation modifiers on splines' points rather than on filled curve/surface |
| Execution Time | FLOAT | 0 | -10000 – 10000 | Time in seconds that the modifier took to evaluate. This is only set on evaluated objects. If multiple modifiers run in parallel, execution time is not a reliable metric. |
| Persistent UID | INT | 0 | -10000 – 10000 | Uniquely identifies the modifier within the modifier stack that it is part of |
| Layer | STRING | – | – | Layer name |
| Use Layer Pass | BOOLEAN | uit | – | Use layer pass filter |
| Layer Pass | INT | 0 | 0 – 100 | Layer pass filter |
| Invert Layer | BOOLEAN | uit | – | Invert layer filter |
| Invert Layer Pass | BOOLEAN | uit | – | Invert layer pass filter |
| Layer Group | BOOLEAN | uit | – | Filter by layer group name |
| Material | POINTER | – | – | Material used for filtering |
| Use Material Pass | BOOLEAN | uit | – | Use material pass filter |
| Material Pass | INT | 0 | 0 – 100 | Material pass |
| Invert Material | BOOLEAN | uit | – | Invert material filter |
| Invert Material Pass | BOOLEAN | uit | – | Invert material pass filter |
| open_constant_offset_panel | BOOLEAN | uit | – | |
| open_relative_offset_panel | BOOLEAN | uit | – | |
| open_object_offset_panel | BOOLEAN | uit | – | |
| open_randomize_panel | BOOLEAN | uit | – | |
| open_influence_panel | BOOLEAN | uit | – | |
| Count | INT | 2 | 1 – 50 | Number of items |
| Offset Object | POINTER | – | – | Use the location and rotation of another object to determine the distance and rotational change between arrayed items |
| Constant Offset | FLOAT | 0 | – | Value for the distance between items |
| Relative Offset | FLOAT | 0 | – | The size of the geometry will determine the distance between arrayed items |
| Random Offset | FLOAT | 0 | – | Value for changes in location |
| Random Rotation | FLOAT | 0 | – | Value for changes in rotation |
| Scale | FLOAT | 0 | – | Value for changes in scale |
| Seed | INT | 1 | 0 – 10000 | Random seed |
| Material | INT | 0 | 0 – 32767 | Index of the material used for generated strokes (0 keep original material) |
| Offset | BOOLEAN | uit | – | Enable offset |
| Use Object Offset | BOOLEAN | uit | – | Add another object's transformation to the total offset |
| Shift | BOOLEAN | aan | – | Add an offset relative to the object's bounding box |
| Uniform Scale | BOOLEAN | uit | – | Use the same random seed for each scale axis for a uniform scale |
Build — Laat strokes na elkaar verschijnen of verdwijnen over een ingestelde tijdspanne, per stroke of per punt. Het standaardmiddel voor een "live getekend" animatie-effect zonder elk frame apart te moeten intekenen.
| Instelling | Type | Standaard | Bereik | Wat hij doet (tooltip uit Blender) |
|---|---|---|---|---|
| Apply on Spline | BOOLEAN | uit | – | Apply this and all preceding deformation modifiers on splines' points rather than on filled curve/surface |
| Execution Time | FLOAT | 0 | -10000 – 10000 | Time in seconds that the modifier took to evaluate. This is only set on evaluated objects. If multiple modifiers run in parallel, execution time is not a reliable metric. |
| Persistent UID | INT | 0 | -10000 – 10000 | Uniquely identifies the modifier within the modifier stack that it is part of |
| Layer | STRING | – | – | Layer name |
| Use Layer Pass | BOOLEAN | uit | – | Use layer pass filter |
| Layer Pass | INT | 0 | 0 – 100 | Layer pass filter |
| Invert Layer | BOOLEAN | uit | – | Invert layer filter |
| Invert Layer Pass | BOOLEAN | uit | – | Invert layer pass filter |
| Layer Group | BOOLEAN | uit | – | Filter by layer group name |
| Material | POINTER | – | – | Material used for filtering |
| Use Material Pass | BOOLEAN | uit | – | Use material pass filter |
| Material Pass | INT | 0 | 0 – 100 | Material pass |
| Invert Material | BOOLEAN | uit | – | Invert material filter |
| Invert Material Pass | BOOLEAN | uit | – | Invert material pass filter |
| open_influence_panel | BOOLEAN | uit | – | |
| open_frame_range_panel | BOOLEAN | uit | – | |
| open_fading_panel | BOOLEAN | uit | – | |
| Mode | ENUM | SEQUENTIAL | Sequential, Concurrent, Additive | How strokes are being built |
| Transition | ENUM | GROW | Grow, Shrink, Vanish | How are strokes animated (i.e. are they appearing or disappearing) |
| Delay | FLOAT | 0 | 0 – 200 | Number of frames after each GP keyframe before the modifier has any effect |
| Length | FLOAT | 100 | 1 – 1000 | Maximum number of frames that the build effect can run for (unless another GP keyframe occurs before this time has elapsed) |
| Time Alignment | ENUM | START | Align Start, Align End | How should strokes start to appear/disappear |
| Timing | ENUM | FRAMES | Natural Drawing Speed, Number of Frames, Percentage Factor | Use drawing speed, a number of frames, or a manual factor to build strokes |
| Speed Factor | FLOAT | 1.2 | 0 – 5 | Multiply recorded drawing speed by a factor |
| Maximum Gap | FLOAT | 0.5 | 0 – 4 | The maximum gap between strokes in seconds |
| Restrict Frame Range | BOOLEAN | uit | – | Only modify strokes during the specified frame range |
| Restrict Visible Points | BOOLEAN | uit | – | Use a percentage factor to determine the visible points |
| Factor | FLOAT | 0 | 0 – 1 | Defines how much of the stroke is visible |
| Start Frame | FLOAT | 1 | -1048574 – 1048574 | Start Frame (when Restrict Frame Range is enabled) |
| End Frame | FLOAT | 125 | -1048574 – 1048574 | End Frame (when Restrict Frame Range is enabled) |
| Use Fading | BOOLEAN | uit | – | Fade out strokes instead of directly cutting off |
| Fade Factor | FLOAT | 0 | 0 – 1 | Defines how much of the stroke is fading in/out |
| Vertex Group | STRING | – | – | Output Vertex group |
| Opacity Strength | FLOAT | 0 | 0 – 1 | How much strength fading applies on top of stroke opacity |
| Thickness Strength | FLOAT | 0 | 0 – 1 | How much strength fading applies on top of stroke thickness |
| Object | POINTER | – | – | Object used as build starting position |
Dot Dash — Zet doorlopende strokes om in een stippel- of streepjespatroon, met instelbare segmentlengte en gaten ertussen. Nuttig voor technische tekeningen, contourlijnen die gestippeld moeten ogen, of een morse-achtig animatie-effect.
| Instelling | Type | Standaard | Bereik | Wat hij doet (tooltip uit Blender) |
|---|
Envelope · Length · Line Art
Envelope — Vervangt strokes door een omhullende vorm die de originele punten met rechte of gebogen segmenten verbindt, met een instelbare marge. Snel een vloeiende, vereenvoudigde envelop rond een ruwe schets trekken, of een spanningsveld-achtig lijneffect opbouwen.
| Instelling | Type | Standaard | Bereik | Wat hij doet (tooltip uit Blender) |
|---|---|---|---|---|
| Apply on Spline | BOOLEAN | uit | – | Apply this and all preceding deformation modifiers on splines' points rather than on filled curve/surface |
| Execution Time | FLOAT | 0 | -10000 – 10000 | Time in seconds that the modifier took to evaluate. This is only set on evaluated objects. If multiple modifiers run in parallel, execution time is not a reliable metric. |
| Persistent UID | INT | 0 | -10000 – 10000 | Uniquely identifies the modifier within the modifier stack that it is part of |
| Layer | STRING | – | – | Layer name |
| Use Layer Pass | BOOLEAN | uit | – | Use layer pass filter |
| Layer Pass | INT | 0 | 0 – 100 | Layer pass filter |
| Invert Layer | BOOLEAN | uit | – | Invert layer filter |
| Invert Layer Pass | BOOLEAN | uit | – | Invert layer pass filter |
| Layer Group | BOOLEAN | uit | – | Filter by layer group name |
| Material | POINTER | – | – | Material used for filtering |
| Use Material Pass | BOOLEAN | uit | – | Use material pass filter |
| Material Pass | INT | 0 | 0 – 100 | Material pass |
| Invert Material | BOOLEAN | uit | – | Invert material filter |
| Invert Material Pass | BOOLEAN | uit | – | Invert material pass filter |
| Vertex Group | STRING | – | – | Vertex group name for modulating the deform |
| Invert Vertex Group | BOOLEAN | uit | – | Invert vertex group weights |
| open_influence_panel | BOOLEAN | uit | – | |
| Mode | ENUM | SEGMENTS | Deform, Segments, Fills | Algorithm to use for generating the envelope |
| Spread Length | INT | 10 | 1 – onbegrensd | The number of points to skip to create straight segments |
| Material Index | INT | -1 | -1 – 32767 | The material to use for the new strokes |
| Thickness | FLOAT | 1 | 0 – 1 | Multiplier for the thickness of the new strokes |
| Strength | FLOAT | 1 | 0 – 1 | Multiplier for the strength of the new strokes |
| Skip Segments | INT | 0 | 0 – onbegrensd | The number of generated segments to skip to reduce complexity |
Length — Verlengt of verkort strokes vanaf hun uiteinden, met een aparte factor voor begin en einde. Laat een handgetekende lijn net iets "overshooten" voorbij het eindpunt, zoals in schetsstijl-tekeningen gebruikelijk is.
| Instelling | Type | Standaard | Bereik | Wat hij doet (tooltip uit Blender) |
|---|---|---|---|---|
| Apply on Spline | BOOLEAN | uit | – | Apply this and all preceding deformation modifiers on splines' points rather than on filled curve/surface |
| Execution Time | FLOAT | 0 | -10000 – 10000 | Time in seconds that the modifier took to evaluate. This is only set on evaluated objects. If multiple modifiers run in parallel, execution time is not a reliable metric. |
| Persistent UID | INT | 0 | -10000 – 10000 | Uniquely identifies the modifier within the modifier stack that it is part of |
| Layer | STRING | – | – | Layer name |
| Use Layer Pass | BOOLEAN | uit | – | Use layer pass filter |
| Layer Pass | INT | 0 | 0 – 100 | Layer pass filter |
| Invert Layer | BOOLEAN | uit | – | Invert layer filter |
| Invert Layer Pass | BOOLEAN | uit | – | Invert layer pass filter |
| Layer Group | BOOLEAN | uit | – | Filter by layer group name |
| Material | POINTER | – | – | Material used for filtering |
| Use Material Pass | BOOLEAN | uit | – | Use material pass filter |
| Material Pass | INT | 0 | 0 – 100 | Material pass |
| Invert Material | BOOLEAN | uit | – | Invert material filter |
| Invert Material Pass | BOOLEAN | uit | – | Invert material pass filter |
| open_random_panel | BOOLEAN | uit | – | |
| open_curvature_panel | BOOLEAN | uit | – | |
| open_influence_panel | BOOLEAN | uit | – | |
| Start Factor | FLOAT | 0.1 | -10 – 10 | Added length to the start of each stroke relative to its length |
| End Factor | FLOAT | 0.1 | -10 – 10 | Added length to the end of each stroke relative to its length |
| Start Factor | FLOAT | 0.1 | -100 – 100 | Absolute added length to the start of each stroke |
| End Factor | FLOAT | 0.1 | -100 – 100 | Absolute added length to the end of each stroke |
| Random Start Factor | FLOAT | 0 | -10 – 10 | Size of random length added to the start of each stroke |
| Random End Factor | FLOAT | 0 | -10 – 10 | Size of random length added to the end of each stroke |
| Random Noise Offset | FLOAT | 0 | 0 – 100 | Smoothly offset each stroke's random value |
| Random | BOOLEAN | uit | – | Use random values over time |
| Seed | INT | 0 | 0 – 10000 | Random seed |
| Step | INT | 4 | 1 – 100 | Number of frames between randomization steps |
| Used Length | FLOAT | 0.1 | 0 – 1 | Defines what portion of the stroke is used for the calculation of the extension |
| Mode | ENUM | RELATIVE | Relative, Absolute | Mode to define length |
| Use Curvature | BOOLEAN | aan | – | Follow the curvature of the stroke |
| Invert Curvature | BOOLEAN | uit | – | Invert the curvature of the stroke's extension |
| Point Density | FLOAT | 30 | 0.1 – 1000 | Multiplied by Start/End for the total added point count |
| Segment Influence | FLOAT | 0 | 0 – 1 | Factor to determine how much the length of the individual segments should influence the final computed curvature. Higher factors makes small segments influence the overall curvature less. |
| Filter Angle | FLOAT | 2.967 | 0 – 3.1329 | Ignore points on the stroke that deviate from their neighbors by more than this angle when determining the extrapolation shape |
Line Art — Genereert automatisch strokes vanuit de echte 3D-geometrie van de scène: contourlijnen, scherpe randen, silhouetten en verborgen lijnen, herberekend telkens de camera of geometrie verandert. De brug tussen een volwaardige 3D-scène en een non-photorealistic, handgetekend ogend resultaat.
Wat gaat er mis — Line Art rekent bij elke update over de volledige scène-geometrie, wat traag wordt bij hoge polycount; beperk het bereik met een Collection- of Object-filter in plaats van de hele scène te laten meewegen.
| Instelling | Type | Standaard | Bereik | Wat hij doet (tooltip uit Blender) |
|---|
Line Art naast de tekening
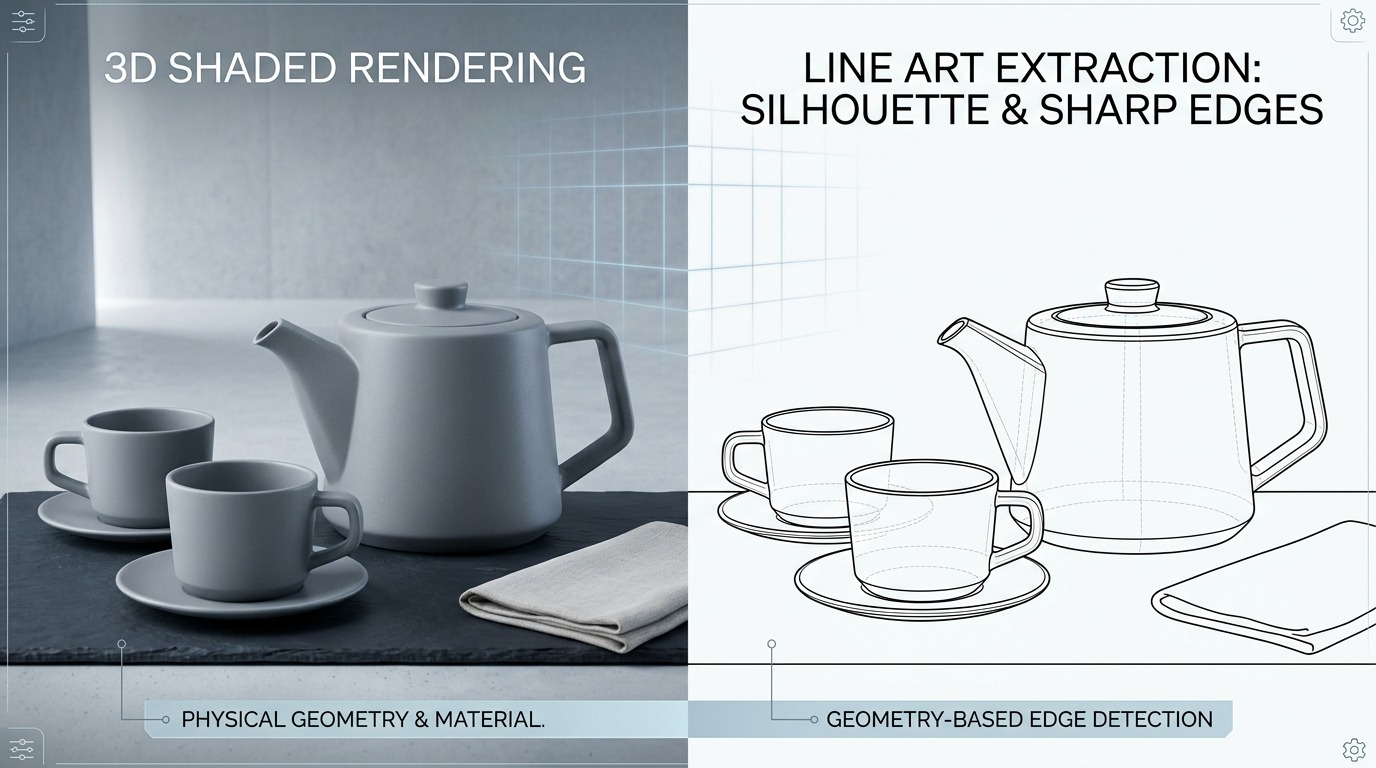
- 13D-geometrie
De brongeometrie die Line Art elk frame opnieuw afleest.
- 2Gegenereerde strokes
Contour, scherpe randen en verborgen lijnen, elk als aparte laag met een eigen Dot Dash-instelling.
Mirror · Multiple Strokes · Outline
Mirror — Spiegelt strokes over een as van het object, live net als de mesh-Mirror. De helft van een symmetrisch personage of pictogram tekenen en de rest automatisch laten volgen.
| Instelling | Type | Standaard | Bereik | Wat hij doet (tooltip uit Blender) |
|---|---|---|---|---|
| Apply on Spline | BOOLEAN | uit | – | Apply this and all preceding deformation modifiers on splines' points rather than on filled curve/surface |
| Execution Time | FLOAT | 0 | -10000 – 10000 | Time in seconds that the modifier took to evaluate. This is only set on evaluated objects. If multiple modifiers run in parallel, execution time is not a reliable metric. |
| Persistent UID | INT | 0 | -10000 – 10000 | Uniquely identifies the modifier within the modifier stack that it is part of |
| Layer | STRING | – | – | Layer name |
| Use Layer Pass | BOOLEAN | uit | – | Use layer pass filter |
| Layer Pass | INT | 0 | 0 – 100 | Layer pass filter |
| Invert Layer | BOOLEAN | uit | – | Invert layer filter |
| Invert Layer Pass | BOOLEAN | uit | – | Invert layer pass filter |
| Layer Group | BOOLEAN | uit | – | Filter by layer group name |
| Material | POINTER | – | – | Material used for filtering |
| Use Material Pass | BOOLEAN | uit | – | Use material pass filter |
| Material Pass | INT | 0 | 0 – 100 | Material pass |
| Invert Material | BOOLEAN | uit | – | Invert material filter |
| Invert Material Pass | BOOLEAN | uit | – | Invert material pass filter |
| open_influence_panel | BOOLEAN | uit | – | |
| Object | POINTER | – | – | Object used as center |
| X | BOOLEAN | aan | – | Mirror the X axis |
| Y | BOOLEAN | uit | – | Mirror the Y axis |
| Z | BOOLEAN | uit | – | Mirror the Z axis |
Multiple Strokes — Genereert meerdere evenwijdige kopieën rond elke originele stroke, met een instelbare afstand en dikte-afname naar de randen toe. Het effect van een dikke, met meerdere pennen getekende contourlijn uit één enkele stroke.
| Instelling | Type | Standaard | Bereik | Wat hij doet (tooltip uit Blender) |
|---|---|---|---|---|
| Apply on Spline | BOOLEAN | uit | – | Apply this and all preceding deformation modifiers on splines' points rather than on filled curve/surface |
| Execution Time | FLOAT | 0 | -10000 – 10000 | Time in seconds that the modifier took to evaluate. This is only set on evaluated objects. If multiple modifiers run in parallel, execution time is not a reliable metric. |
| Persistent UID | INT | 0 | -10000 – 10000 | Uniquely identifies the modifier within the modifier stack that it is part of |
| Layer | STRING | – | – | Layer name |
| Use Layer Pass | BOOLEAN | uit | – | Use layer pass filter |
| Layer Pass | INT | 0 | 0 – 100 | Layer pass filter |
| Invert Layer | BOOLEAN | uit | – | Invert layer filter |
| Invert Layer Pass | BOOLEAN | uit | – | Invert layer pass filter |
| Layer Group | BOOLEAN | uit | – | Filter by layer group name |
| Material | POINTER | – | – | Material used for filtering |
| Use Material Pass | BOOLEAN | uit | – | Use material pass filter |
| Material Pass | INT | 0 | 0 – 100 | Material pass |
| Invert Material | BOOLEAN | uit | – | Invert material filter |
| Invert Material Pass | BOOLEAN | uit | – | Invert material pass filter |
| open_fading_panel | BOOLEAN | uit | – | |
| open_influence_panel | BOOLEAN | uit | – | |
| Fade | BOOLEAN | uit | – | Fade the stroke thickness for each generated stroke |
| Duplicates | INT | 3 | 1 – 10 | How many copies of strokes be displayed |
| Distance | FLOAT | 0.1 | 0 – 1 | Distance of duplications |
| Offset | FLOAT | 0 | -1 – 1 | Offset of duplicates, -1 to 1 (inner to outer) |
| Thickness | FLOAT | 0.5 | 0 – 1 | Fade influence of stroke's thickness |
| Opacity | FLOAT | 0.5 | 0 – 1 | Fade influence of stroke's opacity |
| Center | FLOAT | 0.5 | 0 – 1 | Fade center |
Outline — Zet een stroke om in de contourlijn van zijn eigen gevulde vorm, met een instelbare dikte. Bijvoorbeeld om automatisch een dikke buitenrand rond een silhouet te tekenen zonder die zelf na te trekken.
| Instelling | Type | Standaard | Bereik | Wat hij doet (tooltip uit Blender) |
|---|---|---|---|---|
| Apply on Spline | BOOLEAN | uit | – | Apply this and all preceding deformation modifiers on splines' points rather than on filled curve/surface |
| Execution Time | FLOAT | 0 | -10000 – 10000 | Time in seconds that the modifier took to evaluate. This is only set on evaluated objects. If multiple modifiers run in parallel, execution time is not a reliable metric. |
| Persistent UID | INT | 0 | -10000 – 10000 | Uniquely identifies the modifier within the modifier stack that it is part of |
| Layer | STRING | – | – | Layer name |
| Use Layer Pass | BOOLEAN | uit | – | Use layer pass filter |
| Layer Pass | INT | 0 | 0 – 100 | Layer pass filter |
| Invert Layer | BOOLEAN | uit | – | Invert layer filter |
| Invert Layer Pass | BOOLEAN | uit | – | Invert layer pass filter |
| Layer Group | BOOLEAN | uit | – | Filter by layer group name |
| Material | POINTER | – | – | Material used for filtering |
| Use Material Pass | BOOLEAN | uit | – | Use material pass filter |
| Material Pass | INT | 0 | 0 – 100 | Material pass |
| Invert Material | BOOLEAN | uit | – | Invert material filter |
| Invert Material Pass | BOOLEAN | uit | – | Invert material pass filter |
| open_influence_panel | BOOLEAN | uit | – | |
| Thickness | INT | 1 | 1 – 1000 | Thickness of the perimeter stroke |
| Sample Length | FLOAT | 0 | 0 – 100 | |
| Subdivisions | INT | 3 | 0 – 10 | Number of subdivisions |
| Keep Shape | BOOLEAN | aan | – | Try to keep global shape |
| Outline Material | POINTER | – | – | Material used for outline strokes |
| Target Object | POINTER | – | – | Target object to define stroke start |
Simplify · Subdivide
Simplify — Vermindert het aantal punten in een stroke volgens verschillende methodes (Fixed, Adaptive, Sample, Merge). Opschonen van te gedetailleerd lijnenwerk uit een scan of tekentablet zonder de vorm merkbaar te veranderen.
| Instelling | Type | Standaard | Bereik | Wat hij doet (tooltip uit Blender) |
|---|---|---|---|---|
| Apply on Spline | BOOLEAN | uit | – | Apply this and all preceding deformation modifiers on splines' points rather than on filled curve/surface |
| Execution Time | FLOAT | 0 | -10000 – 10000 | Time in seconds that the modifier took to evaluate. This is only set on evaluated objects. If multiple modifiers run in parallel, execution time is not a reliable metric. |
| Persistent UID | INT | 0 | -10000 – 10000 | Uniquely identifies the modifier within the modifier stack that it is part of |
| Layer | STRING | – | – | Layer name |
| Use Layer Pass | BOOLEAN | uit | – | Use layer pass filter |
| Layer Pass | INT | 0 | 0 – 100 | Layer pass filter |
| Invert Layer | BOOLEAN | uit | – | Invert layer filter |
| Invert Layer Pass | BOOLEAN | uit | – | Invert layer pass filter |
| Layer Group | BOOLEAN | uit | – | Filter by layer group name |
| Material | POINTER | – | – | Material used for filtering |
| Use Material Pass | BOOLEAN | uit | – | Use material pass filter |
| Material Pass | INT | 0 | 0 – 100 | Material pass |
| Invert Material | BOOLEAN | uit | – | Invert material filter |
| Invert Material Pass | BOOLEAN | uit | – | Invert material pass filter |
| Vertex Group | STRING | – | – | Vertex group name for modulating the deform |
| Invert Vertex Group | BOOLEAN | uit | – | Invert vertex group weights |
| open_influence_panel | BOOLEAN | uit | – | |
| Factor | FLOAT | 0 | 0 – 5 | Factor of Simplify |
| Mode | ENUM | FIXED | Fixed, Adaptive, Sample, Merge | How to simplify the stroke |
| Iterations | INT | 1 | 1 – 50 | Number of times to apply simplify |
| Length | FLOAT | 0.1 | 0.005 – 1 | Length of each segment |
| Sharp Threshold | FLOAT | 0 | 0 – 3.1416 | Preserve corners that have sharper angle than this threshold |
| Distance | FLOAT | 0.1 | 0 – 1 | Distance between points |
Subdivide — Voegt extra punten tussen bestaande strokepunten toe voor een vloeiendere curve, optioneel met een smoothing-factor. De GP-tegenhanger van Subdivision Surface, maar dan om een hoekige lijn vloeiender te maken.
| Instelling | Type | Standaard | Bereik | Wat hij doet (tooltip uit Blender) |
|---|---|---|---|---|
| Apply on Spline | BOOLEAN | uit | – | Apply this and all preceding deformation modifiers on splines' points rather than on filled curve/surface |
| Execution Time | FLOAT | 0 | -10000 – 10000 | Time in seconds that the modifier took to evaluate. This is only set on evaluated objects. If multiple modifiers run in parallel, execution time is not a reliable metric. |
| Persistent UID | INT | 0 | -10000 – 10000 | Uniquely identifies the modifier within the modifier stack that it is part of |
| Layer | STRING | – | – | Layer name |
| Use Layer Pass | BOOLEAN | uit | – | Use layer pass filter |
| Layer Pass | INT | 0 | 0 – 100 | Layer pass filter |
| Invert Layer | BOOLEAN | uit | – | Invert layer filter |
| Invert Layer Pass | BOOLEAN | uit | – | Invert layer pass filter |
| Layer Group | BOOLEAN | uit | – | Filter by layer group name |
| Material | POINTER | – | – | Material used for filtering |
| Use Material Pass | BOOLEAN | uit | – | Use material pass filter |
| Material Pass | INT | 0 | 0 – 100 | Material pass |
| Invert Material | BOOLEAN | uit | – | Invert material filter |
| Invert Material Pass | BOOLEAN | uit | – | Invert material pass filter |
| open_influence_panel | BOOLEAN | uit | – | |
| Level | INT | 1 | 0 – 6 | Level of subdivision |
| Subdivision Type | ENUM | CATMULL_CLARK | Catmull-Clark, Simple | Select type of subdivision algorithm |
Deform en Color — vervormen en herkleuren
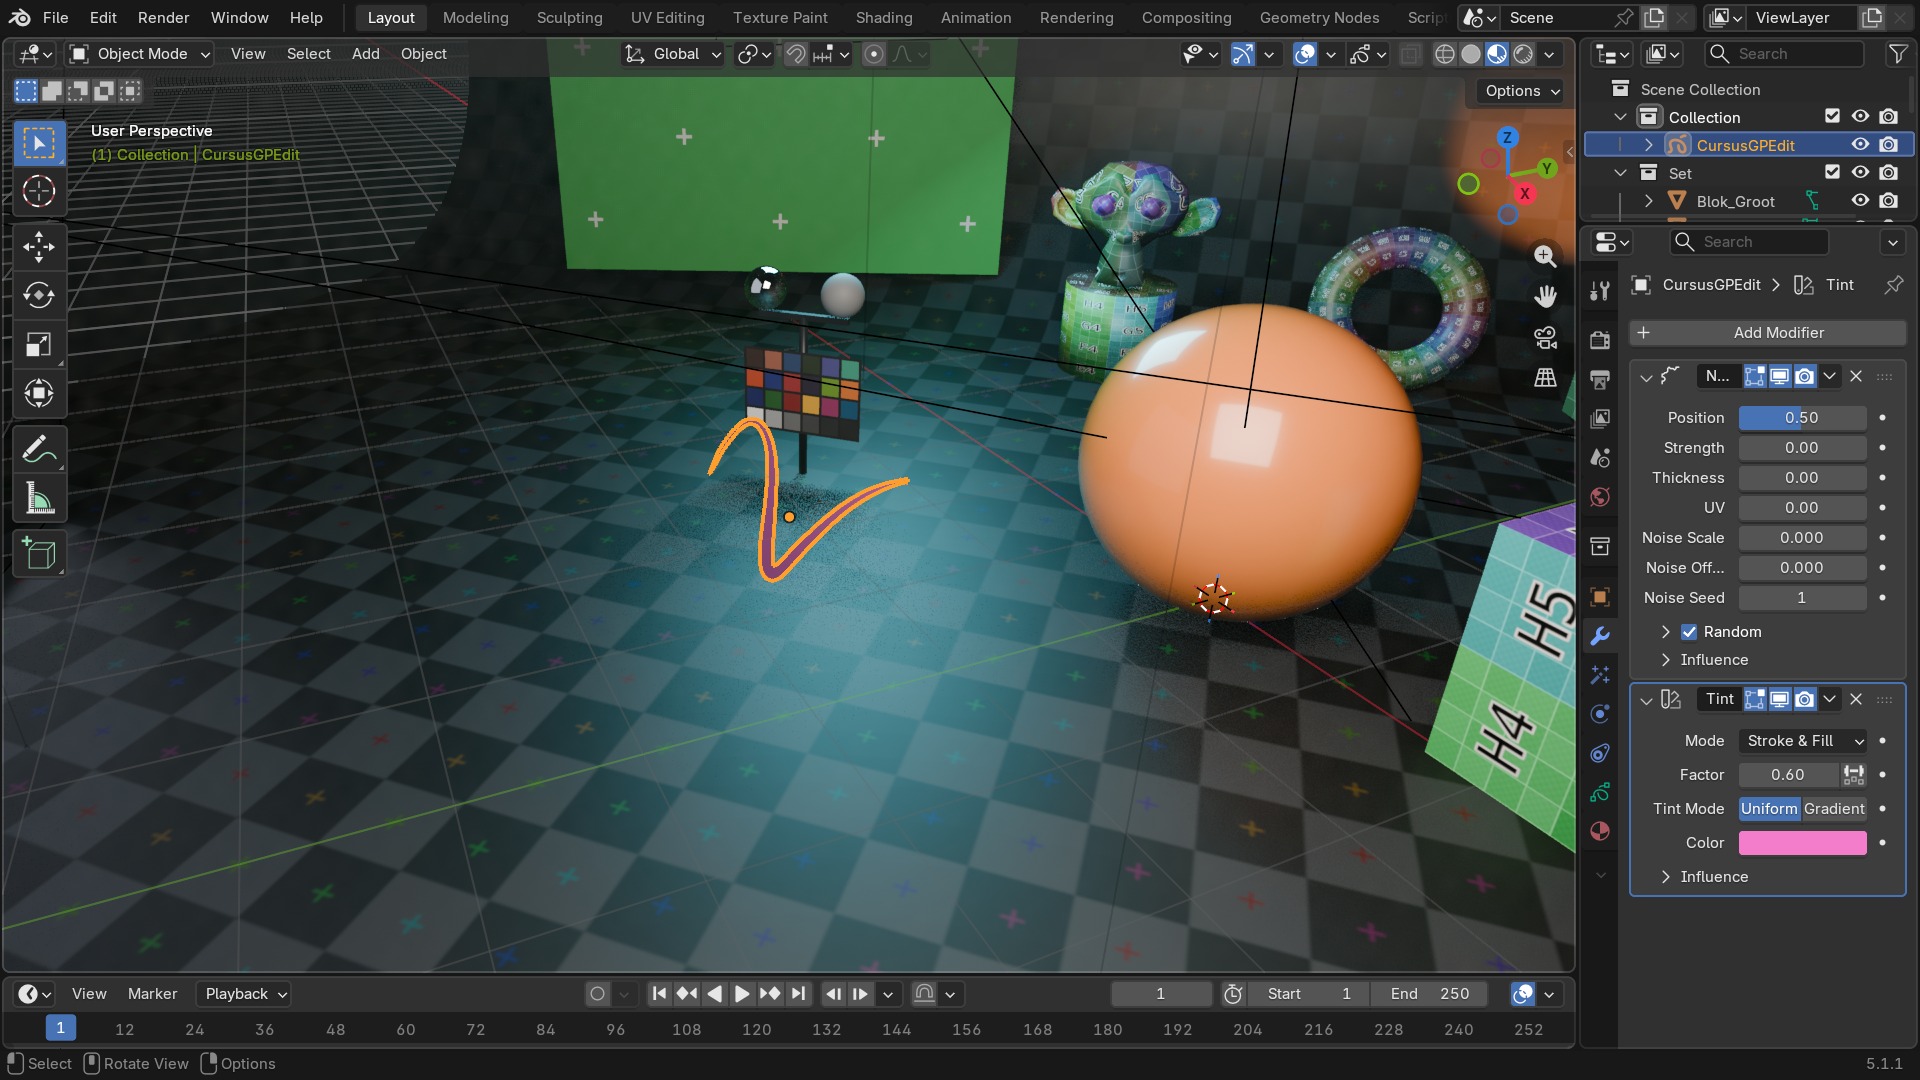
Vijftien modifiers die geen strokes toevoegen of wegnemen, maar hun bestaande punten verplaatsen (Armature, Hook, Lattice, Noise, Shrinkwrap...) of hun kleur en dekking herschrijven (Color, Opacity, Tint) — het GP-equivalent van de mesh-categorieën Deform en Modify samen, hier door Blender in één groep ondergebracht.
 RECBLENDER 5.1 · F76-DEFORM-COLOR-MODIFIERS00:00:00:001920×1080
Armature · Hook · Hue/Saturation
Armature — Vervormt strokes volgens de bones van een armature, net als de mesh-Armature-modifier. De manier om een getekend personage aan een skelet te riggen zodat het net als een mesh kan poseren en animeren.
| Instelling | Type | Standaard | Bereik | Wat hij doet (tooltip uit Blender) |
|---|---|---|---|---|
| Apply on Spline | BOOLEAN | uit | – | Apply this and all preceding deformation modifiers on splines' points rather than on filled curve/surface |
| Execution Time | FLOAT | 0 | -10000 – 10000 | Time in seconds that the modifier took to evaluate. This is only set on evaluated objects. If multiple modifiers run in parallel, execution time is not a reliable metric. |
| Persistent UID | INT | 0 | -10000 – 10000 | Uniquely identifies the modifier within the modifier stack that it is part of |
| Vertex Group | STRING | – | – | Vertex group name for modulating the deform |
| Invert Vertex Group | BOOLEAN | uit | – | Invert vertex group weights |
| open_influence_panel | BOOLEAN | uit | – | |
| Object | POINTER | – | – | Armature object to deform with |
| Use Bone Envelopes | BOOLEAN | uit | – | Bind Bone envelopes to armature modifier |
| Use Vertex Groups | BOOLEAN | aan | – | Bind vertex groups to armature modifier |
| Preserve Volume | BOOLEAN | uit | – | Deform rotation interpolation with quaternions |
Hook — Koppelt strokepunten aan een los controle-object, zodat het verplaatsen van dat object de bijbehorende punten meetrekt. Handmatige, procedureel-vrije vervorming van een tekening zonder een volledige rig.
| Instelling | Type | Standaard | Bereik | Wat hij doet (tooltip uit Blender) |
|---|---|---|---|---|
| Apply on Spline | BOOLEAN | uit | – | Apply this and all preceding deformation modifiers on splines' points rather than on filled curve/surface |
| Execution Time | FLOAT | 0 | -10000 – 10000 | Time in seconds that the modifier took to evaluate. This is only set on evaluated objects. If multiple modifiers run in parallel, execution time is not a reliable metric. |
| Persistent UID | INT | 0 | -10000 – 10000 | Uniquely identifies the modifier within the modifier stack that it is part of |
| Layer | STRING | – | – | Layer name |
| Use Layer Pass | BOOLEAN | uit | – | Use layer pass filter |
| Layer Pass | INT | 0 | 0 – 100 | Layer pass filter |
| Invert Layer | BOOLEAN | uit | – | Invert layer filter |
| Invert Layer Pass | BOOLEAN | uit | – | Invert layer pass filter |
| Layer Group | BOOLEAN | uit | – | Filter by layer group name |
| Material | POINTER | – | – | Material used for filtering |
| Use Material Pass | BOOLEAN | uit | – | Use material pass filter |
| Material Pass | INT | 0 | 0 – 100 | Material pass |
| Invert Material | BOOLEAN | uit | – | Invert material filter |
| Invert Material Pass | BOOLEAN | uit | – | Invert material pass filter |
| Vertex Group | STRING | – | – | Vertex group name for modulating the deform |
| Invert Vertex Group | BOOLEAN | uit | – | Invert vertex group weights |
| Use Custom Curve | BOOLEAN | uit | – | Use a custom curve to define a factor along the strokes |
| Curve | POINTER | – | – | Custom curve to apply effect |
| open_influence_panel | BOOLEAN | uit | – | |
| open_falloff_panel | BOOLEAN | uit | – | |
| Object | POINTER | – | – | Parent Object for hook, also recalculates and clears offset |
| Sub-Target | STRING | – | – | Name of Parent Bone for hook (if applicable), also recalculates and clears offset |
| Strength | FLOAT | 0.5 | 0 – 1 | Relative force of the hook |
| Falloff Type | ENUM | SMOOTH | No Falloff, Curve, Smooth, Sphere, Root, Inverse Square, Sharp, Linear, Constant | |
| Radius | FLOAT | 0 | 0 – 100 | If not zero, the distance from the hook where influence ends |
| Hook Center | FLOAT | 0 | -10000 – 10000 | |
| Matrix | FLOAT | 0 | -10000 – 10000 | Reverse the transformation between this object and its target |
| Uniform Falloff | BOOLEAN | uit | – | Compensate for non-uniform object scale |
Hue/Saturation — Past hue, saturation en value van strokes en fills aan, los van het onderliggende materiaal. Snel een hele tekenlaag een andere kleurzweem geven zonder elk materiaal apart te herkleuren.
| Instelling | Type | Standaard | Bereik | Wat hij doet (tooltip uit Blender) |
|---|---|---|---|---|
| Apply on Spline | BOOLEAN | uit | – | Apply this and all preceding deformation modifiers on splines' points rather than on filled curve/surface |
| Execution Time | FLOAT | 0 | -10000 – 10000 | Time in seconds that the modifier took to evaluate. This is only set on evaluated objects. If multiple modifiers run in parallel, execution time is not a reliable metric. |
| Persistent UID | INT | 0 | -10000 – 10000 | Uniquely identifies the modifier within the modifier stack that it is part of |
| Layer | STRING | – | – | Layer name |
| Use Layer Pass | BOOLEAN | uit | – | Use layer pass filter |
| Layer Pass | INT | 0 | 0 – 100 | Layer pass filter |
| Invert Layer | BOOLEAN | uit | – | Invert layer filter |
| Invert Layer Pass | BOOLEAN | uit | – | Invert layer pass filter |
| Layer Group | BOOLEAN | uit | – | Filter by layer group name |
| Material | POINTER | – | – | Material used for filtering |
| Use Material Pass | BOOLEAN | uit | – | Use material pass filter |
| Material Pass | INT | 0 | 0 – 100 | Material pass |
| Invert Material | BOOLEAN | uit | – | Invert material filter |
| Invert Material Pass | BOOLEAN | uit | – | Invert material pass filter |
| Use Custom Curve | BOOLEAN | uit | – | Use a custom curve to define a factor along the strokes |
| Curve | POINTER | – | – | Custom curve to apply effect |
| open_influence_panel | BOOLEAN | uit | – | |
| Mode | ENUM | BOTH | Stroke & Fill, Stroke, Fill | Attributes to modify |
| Hue | FLOAT | 0.5 | 0 – 1 | Color hue offset |
| Saturation | FLOAT | 0.5 | 0 – 2 | Color saturation factor |
| Value | FLOAT | 0.5 | 0 – 2 | Color value factor |
Lattice · Noise · Offset
Lattice — Vervormt strokes volgens de vorm van een Lattice-object eromheen, net als bij een mesh. De globale vorm van een tekening bijsturen zonder elk punt apart te verplaatsen.
| Instelling | Type | Standaard | Bereik | Wat hij doet (tooltip uit Blender) |
|---|---|---|---|---|
| Apply on Spline | BOOLEAN | uit | – | Apply this and all preceding deformation modifiers on splines' points rather than on filled curve/surface |
| Execution Time | FLOAT | 0 | -10000 – 10000 | Time in seconds that the modifier took to evaluate. This is only set on evaluated objects. If multiple modifiers run in parallel, execution time is not a reliable metric. |
| Persistent UID | INT | 0 | -10000 – 10000 | Uniquely identifies the modifier within the modifier stack that it is part of |
| Layer | STRING | – | – | Layer name |
| Use Layer Pass | BOOLEAN | uit | – | Use layer pass filter |
| Layer Pass | INT | 0 | 0 – 100 | Layer pass filter |
| Invert Layer | BOOLEAN | uit | – | Invert layer filter |
| Invert Layer Pass | BOOLEAN | uit | – | Invert layer pass filter |
| Layer Group | BOOLEAN | uit | – | Filter by layer group name |
| Material | POINTER | – | – | Material used for filtering |
| Use Material Pass | BOOLEAN | uit | – | Use material pass filter |
| Material Pass | INT | 0 | 0 – 100 | Material pass |
| Invert Material | BOOLEAN | uit | – | Invert material filter |
| Invert Material Pass | BOOLEAN | uit | – | Invert material pass filter |
| Vertex Group | STRING | – | – | Vertex group name for modulating the deform |
| Invert Vertex Group | BOOLEAN | uit | – | Invert vertex group weights |
| open_influence_panel | BOOLEAN | uit | – | |
| Object | POINTER | – | – | Lattice object to deform with |
| Strength | FLOAT | 1 | 0 – 1 | Strength of modifier effect |
Noise — Voegt willekeurige, organische beving toe aan strokes: positie, rotatie, dikte of kleur kunnen elk apart variëren over tijd. De snelste manier om een te strak, computerprecies getekende lijn een handgetekend, licht trillend karakter te geven.
| Instelling | Type | Standaard | Bereik | Wat hij doet (tooltip uit Blender) |
|---|---|---|---|---|
| Apply on Spline | BOOLEAN | uit | – | Apply this and all preceding deformation modifiers on splines' points rather than on filled curve/surface |
| Execution Time | FLOAT | 0 | -10000 – 10000 | Time in seconds that the modifier took to evaluate. This is only set on evaluated objects. If multiple modifiers run in parallel, execution time is not a reliable metric. |
| Persistent UID | INT | 0 | -10000 – 10000 | Uniquely identifies the modifier within the modifier stack that it is part of |
| Layer | STRING | – | – | Layer name |
| Use Layer Pass | BOOLEAN | uit | – | Use layer pass filter |
| Layer Pass | INT | 0 | 0 – 100 | Layer pass filter |
| Invert Layer | BOOLEAN | uit | – | Invert layer filter |
| Invert Layer Pass | BOOLEAN | uit | – | Invert layer pass filter |
| Layer Group | BOOLEAN | uit | – | Filter by layer group name |
| Material | POINTER | – | – | Material used for filtering |
| Use Material Pass | BOOLEAN | uit | – | Use material pass filter |
| Material Pass | INT | 0 | 0 – 100 | Material pass |
| Invert Material | BOOLEAN | uit | – | Invert material filter |
| Invert Material Pass | BOOLEAN | uit | – | Invert material pass filter |
| Vertex Group | STRING | – | – | Vertex group name for modulating the deform |
| Invert Vertex Group | BOOLEAN | uit | – | Invert vertex group weights |
| Use Custom Curve | BOOLEAN | uit | – | Use a custom curve to define a factor along the strokes |
| Curve | POINTER | – | – | Custom curve to apply effect |
| open_influence_panel | BOOLEAN | uit | – | |
| open_random_panel | BOOLEAN | uit | – | |
| Position Factor | FLOAT | 0.5 | 0 – 1 | Amount of noise to apply |
| Strength Factor | FLOAT | 0 | 0 – 1 | Amount of noise to apply to opacity |
| Thickness Factor | FLOAT | 0 | 0 – 1 | Amount of noise to apply to thickness |
| UV Factor | FLOAT | 0 | 0 – 1 | Amount of noise to apply to UV rotation |
| Random | BOOLEAN | aan | – | Use random values over time |
| Noise Seed | INT | 1 | 0 – 10000 | Random seed |
| Noise Scale | FLOAT | 0 | 0 – 1 | Scale the noise frequency |
| Noise Offset | FLOAT | 0 | 0 – 100 | Offset the noise along the strokes |
| Step | INT | 4 | 1 – 100 | Number of frames between randomization steps |
| Mode | ENUM | STEP | Steps, Keyframes | Where to perform randomization |
Offset — Verplaatst, roteert of schaalt strokes ten opzichte van hun oorspronkelijke positie, per stroke of met een willekeurige variatie per kopie. Snel een laag strokes een beetje laten verschuiven zonder ze een voor een te verslepen.
| Instelling | Type | Standaard | Bereik | Wat hij doet (tooltip uit Blender) |
|---|---|---|---|---|
| Apply on Spline | BOOLEAN | uit | – | Apply this and all preceding deformation modifiers on splines' points rather than on filled curve/surface |
| Execution Time | FLOAT | 0 | -10000 – 10000 | Time in seconds that the modifier took to evaluate. This is only set on evaluated objects. If multiple modifiers run in parallel, execution time is not a reliable metric. |
| Persistent UID | INT | 0 | -10000 – 10000 | Uniquely identifies the modifier within the modifier stack that it is part of |
| Layer | STRING | – | – | Layer name |
| Use Layer Pass | BOOLEAN | uit | – | Use layer pass filter |
| Layer Pass | INT | 0 | 0 – 100 | Layer pass filter |
| Invert Layer | BOOLEAN | uit | – | Invert layer filter |
| Invert Layer Pass | BOOLEAN | uit | – | Invert layer pass filter |
| Layer Group | BOOLEAN | uit | – | Filter by layer group name |
| Material | POINTER | – | – | Material used for filtering |
| Use Material Pass | BOOLEAN | uit | – | Use material pass filter |
| Material Pass | INT | 0 | 0 – 100 | Material pass |
| Invert Material | BOOLEAN | uit | – | Invert material filter |
| Invert Material Pass | BOOLEAN | uit | – | Invert material pass filter |
| Vertex Group | STRING | – | – | Vertex group name for modulating the deform |
| Invert Vertex Group | BOOLEAN | uit | – | Invert vertex group weights |
| open_general_panel | BOOLEAN | uit | – | |
| open_influence_panel | BOOLEAN | uit | – | |
| Mode | ENUM | RANDOM | Random, Layer, Stroke, Material | |
| Location | FLOAT | 0 | – | Values for change location |
| Rotation | FLOAT | 0 | – | Values for changes in rotation |
| Scale | FLOAT | 0 | – | Values for changes in scale |
| Random Offset | FLOAT | 0 | – | Value for changes in location |
| Random Rotation | FLOAT | 0 | – | Value for changes in rotation |
| Scale | FLOAT | 0 | – | Value for changes in scale |
| Seed | INT | 0 | 0 – 10000 | Random seed |
| Step | INT | 1 | 1 – 500 | Number of elements that will be grouped |
| Start Offset | INT | 0 | 0 – 10000 | Offset starting point |
| Uniform Scale | BOOLEAN | uit | – | Use the same random seed for each scale axis for a uniform scale |
Wat gaat er mis — Deform/Color op Grease Pencil
Deform-modifiers op Grease Pencil werken vaak per laag of materiaal in plaats van op het hele object; vergeet je dat filter in te stellen, dan verandert een Noise- of Thickness-modifier onbedoeld ook lagen die je juist ongemoeid wilde laten. Controleer bij een onverwacht resultaat dus eerst het Layer- en Material-filter bovenaan het modifierpaneel voor je de instellingen zelf verdenkt.
RECBLENDER 5.1 · F76-DEFORM-COLOR-MODIFIERS00:00:00:001920×1080Opacity · Shrinkwrap · Smooth
Opacity — Past de dekking van strokes en fills aan, met een absolute waarde of een vermenigvuldigingsfactor. Een laag geleidelijk laten vervagen zonder de onderliggende materiaal-opacity te moeten wijzigen.
| Instelling | Type | Standaard | Bereik | Wat hij doet (tooltip uit Blender) |
|---|---|---|---|---|
| Apply on Spline | BOOLEAN | uit | – | Apply this and all preceding deformation modifiers on splines' points rather than on filled curve/surface |
| Execution Time | FLOAT | 0 | -10000 – 10000 | Time in seconds that the modifier took to evaluate. This is only set on evaluated objects. If multiple modifiers run in parallel, execution time is not a reliable metric. |
| Persistent UID | INT | 0 | -10000 – 10000 | Uniquely identifies the modifier within the modifier stack that it is part of |
| Layer | STRING | – | – | Layer name |
| Use Layer Pass | BOOLEAN | uit | – | Use layer pass filter |
| Layer Pass | INT | 0 | 0 – 100 | Layer pass filter |
| Invert Layer | BOOLEAN | uit | – | Invert layer filter |
| Invert Layer Pass | BOOLEAN | uit | – | Invert layer pass filter |
| Layer Group | BOOLEAN | uit | – | Filter by layer group name |
| Material | POINTER | – | – | Material used for filtering |
| Use Material Pass | BOOLEAN | uit | – | Use material pass filter |
| Material Pass | INT | 0 | 0 – 100 | Material pass |
| Invert Material | BOOLEAN | uit | – | Invert material filter |
| Invert Material Pass | BOOLEAN | uit | – | Invert material pass filter |
| Vertex Group | STRING | – | – | Vertex group name for modulating the deform |
| Invert Vertex Group | BOOLEAN | uit | – | Invert vertex group weights |
| Use Custom Curve | BOOLEAN | uit | – | Use a custom curve to define a factor along the strokes |
| Curve | POINTER | – | – | Custom curve to apply effect |
| open_influence_panel | BOOLEAN | uit | – | |
| Mode | ENUM | BOTH | Stroke & Fill, Stroke, Fill, Hardness | Attributes to modify |
| Opacity Factor | FLOAT | 1 | 0 – 2 | Factor of opacity |
| Hardness Factor | FLOAT | 1 | 0 – onbegrensd | Factor of stroke hardness |
| Use Weight as Factor | BOOLEAN | uit | – | Use vertex group weight as factor instead of influence |
| Uniform Opacity | BOOLEAN | uit | – | Replace the stroke opacity instead of modulating each point |
Shrinkwrap — Projecteert strokes op het oppervlak van een doelmesh, zodat een 2D-tekening zich om een 3D-vorm heen plooit — bijvoorbeeld een getekend patroon dat mee buigt met een gebogen oppervlak.
Wat gaat er mis — Zonder een kleine positieve Offset kruipen de strokes exact op het doeloppervlak en ontstaat er z-fighting bij het renderen, net als bij de gelijknamige mesh-modifier.
| Instelling | Type | Standaard | Bereik | Wat hij doet (tooltip uit Blender) |
|---|---|---|---|---|
| Apply on Spline | BOOLEAN | uit | – | Apply this and all preceding deformation modifiers on splines' points rather than on filled curve/surface |
| Execution Time | FLOAT | 0 | -10000 – 10000 | Time in seconds that the modifier took to evaluate. This is only set on evaluated objects. If multiple modifiers run in parallel, execution time is not a reliable metric. |
| Persistent UID | INT | 0 | -10000 – 10000 | Uniquely identifies the modifier within the modifier stack that it is part of |
| Layer | STRING | – | – | Layer name |
| Use Layer Pass | BOOLEAN | uit | – | Use layer pass filter |
| Layer Pass | INT | 0 | 0 – 100 | Layer pass filter |
| Invert Layer | BOOLEAN | uit | – | Invert layer filter |
| Invert Layer Pass | BOOLEAN | uit | – | Invert layer pass filter |
| Layer Group | BOOLEAN | uit | – | Filter by layer group name |
| Material | POINTER | – | – | Material used for filtering |
| Use Material Pass | BOOLEAN | uit | – | Use material pass filter |
| Material Pass | INT | 0 | 0 – 100 | Material pass |
| Invert Material | BOOLEAN | uit | – | Invert material filter |
| Invert Material Pass | BOOLEAN | uit | – | Invert material pass filter |
| Vertex Group | STRING | – | – | Vertex group name for modulating the deform |
| Invert Vertex Group | BOOLEAN | uit | – | Invert vertex group weights |
| open_influence_panel | BOOLEAN | uit | – | |
| Wrap Method | ENUM | NEAREST_SURFACEPOINT | Nearest Surface Point, Project, Nearest Vertex, Target Normal Project | |
| Snap Mode | ENUM | ON_SURFACE | On Surface, Inside, Outside, Outside Surface, Above Surface | Select how vertices are constrained to the target surface |
| Face Cull | ENUM | OFF | Off, Front, Back | Stop vertices from projecting to a face on the target when facing towards/away |
| Target | POINTER | – | – | Mesh target to shrink to |
| Auxiliary Target | POINTER | – | – | Additional mesh target to shrink to |
| Offset | FLOAT | 0.05 | -100 – 100 | Distance to keep from the target |
| Project Limit | FLOAT | 0 | 0 – 100 | Limit the distance used for projection (zero disables) |
| X | BOOLEAN | uit | – | |
| Y | BOOLEAN | uit | – | |
| Z | BOOLEAN | uit | – | |
| Subdivision Levels | INT | 0 | 0 – 6 | Number of subdivisions that must be performed before extracting vertices' positions and normals |
| Negative | BOOLEAN | uit | – | Allow vertices to move in the negative direction of axis |
| Positive | BOOLEAN | aan | – | Allow vertices to move in the positive direction of axis |
| Invert Cull | BOOLEAN | uit | – | When projecting in the negative direction invert the face cull mode |
| Smooth Factor | FLOAT | 0.05 | 0 – 1 | Amount of smoothing to apply |
| Steps | INT | 1 | 1 – 10 | Number of times to apply smooth (high numbers can reduce FPS) |
Smooth — Vlakt de vorm van strokes af door naburige punten te middelen. Ruis of een onhandige trilling uit een tekening halen zonder de punten zelf een voor een te moeten corrigeren.
| Instelling | Type | Standaard | Bereik | Wat hij doet (tooltip uit Blender) |
|---|---|---|---|---|
| Apply on Spline | BOOLEAN | uit | – | Apply this and all preceding deformation modifiers on splines' points rather than on filled curve/surface |
| Execution Time | FLOAT | 0 | -10000 – 10000 | Time in seconds that the modifier took to evaluate. This is only set on evaluated objects. If multiple modifiers run in parallel, execution time is not a reliable metric. |
| Persistent UID | INT | 0 | -10000 – 10000 | Uniquely identifies the modifier within the modifier stack that it is part of |
| Layer | STRING | – | – | Layer name |
| Use Layer Pass | BOOLEAN | uit | – | Use layer pass filter |
| Layer Pass | INT | 0 | 0 – 100 | Layer pass filter |
| Invert Layer | BOOLEAN | uit | – | Invert layer filter |
| Invert Layer Pass | BOOLEAN | uit | – | Invert layer pass filter |
| Layer Group | BOOLEAN | uit | – | Filter by layer group name |
| Material | POINTER | – | – | Material used for filtering |
| Use Material Pass | BOOLEAN | uit | – | Use material pass filter |
| Material Pass | INT | 0 | 0 – 100 | Material pass |
| Invert Material | BOOLEAN | uit | – | Invert material filter |
| Invert Material Pass | BOOLEAN | uit | – | Invert material pass filter |
| Vertex Group | STRING | – | – | Vertex group name for modulating the deform |
| Invert Vertex Group | BOOLEAN | uit | – | Invert vertex group weights |
| Use Custom Curve | BOOLEAN | uit | – | Use a custom curve to define a factor along the strokes |
| Curve | POINTER | – | – | Custom curve to apply effect |
| open_influence_panel | BOOLEAN | uit | – | |
| Factor | FLOAT | 1 | 0 – 1 | Amount of smooth to apply |
| Affect Position | BOOLEAN | aan | – | The modifier affects the position of the point |
| Affect Strength | BOOLEAN | uit | – | The modifier affects the color strength of the point |
| Affect Thickness | BOOLEAN | uit | – | The modifier affects the thickness of the point |
| Affect UV | BOOLEAN | uit | – | The modifier affects the UV rotation factor of the point |
| Steps | INT | 1 | 1 – 1000 | Number of times to apply smooth (high numbers can reduce fps) |
| Keep Shape | BOOLEAN | uit | – | Smooth the details, but keep the overall shape |
| Smooth Ends | BOOLEAN | uit | – | Smooth ends of strokes |
Texture Mapping · Thickness · Time Offset
Texture Mapping — Past de UV-mapping van de stroke- en fill-textures aan: offset, schaal en rotatie, per stroke of per laag. Nodig zodra een materiaal met een afbeelding of patroon niet automatisch goed uitgelijnd staat.
| Instelling | Type | Standaard | Bereik | Wat hij doet (tooltip uit Blender) |
|---|---|---|---|---|
| Apply on Spline | BOOLEAN | uit | – | Apply this and all preceding deformation modifiers on splines' points rather than on filled curve/surface |
| Execution Time | FLOAT | 0 | -10000 – 10000 | Time in seconds that the modifier took to evaluate. This is only set on evaluated objects. If multiple modifiers run in parallel, execution time is not a reliable metric. |
| Persistent UID | INT | 0 | -10000 – 10000 | Uniquely identifies the modifier within the modifier stack that it is part of |
| Layer | STRING | – | – | Layer name |
| Use Layer Pass | BOOLEAN | uit | – | Use layer pass filter |
| Layer Pass | INT | 0 | 0 – 100 | Layer pass filter |
| Invert Layer | BOOLEAN | uit | – | Invert layer filter |
| Invert Layer Pass | BOOLEAN | uit | – | Invert layer pass filter |
| Layer Group | BOOLEAN | uit | – | Filter by layer group name |
| Material | POINTER | – | – | Material used for filtering |
| Use Material Pass | BOOLEAN | uit | – | Use material pass filter |
| Material Pass | INT | 0 | 0 – 100 | Material pass |
| Invert Material | BOOLEAN | uit | – | Invert material filter |
| Invert Material Pass | BOOLEAN | uit | – | Invert material pass filter |
| open_influence_panel | BOOLEAN | uit | – | |
| UV Offset | FLOAT | 0 | -100 – 100 | Offset value to add to stroke UVs |
| UV Scale | FLOAT | 1 | 0 – 100 | Factor to scale the UVs |
| Rotation | FLOAT | 0 | -1.5708 – 1.5708 | Additional rotation applied to dots and square strokes |
| Fill Rotation | FLOAT | 0 | -10000 – 10000 | Additional rotation of the fill UV |
| Fill Offset | FLOAT | 0 | -10000 – 10000 | Additional offset of the fill UV |
| Fill Scale | FLOAT | 1 | 0.01 – 100 | Additional scale of the fill UV |
| Fit Method | ENUM | CONSTANT_LENGTH | Constant Length, Stroke Length | |
| Mode | ENUM | STROKE | Stroke, Fill, Stroke & Fill |
Thickness — Past de dikte van bestaande strokes aan, globaal met een factor of absoluut, optioneel beperkt tot één laag of materiaal. De snelste manier om een hele tekening dunner of dikker te maken zonder ze opnieuw te tekenen.
| Instelling | Type | Standaard | Bereik | Wat hij doet (tooltip uit Blender) |
|---|
Time Offset — Verschuift, herhaalt of keert de keyframes van een laag in de tijd om, onafhankelijk van de rest van de scène. Een laag vroeger laten beginnen, in lus laten herhalen, of achterstevoren laten afspelen.
| Instelling | Type | Standaard | Bereik | Wat hij doet (tooltip uit Blender) |
|---|---|---|---|---|
| Apply on Spline | BOOLEAN | uit | – | Apply this and all preceding deformation modifiers on splines' points rather than on filled curve/surface |
| Execution Time | FLOAT | 0 | -10000 – 10000 | Time in seconds that the modifier took to evaluate. This is only set on evaluated objects. If multiple modifiers run in parallel, execution time is not a reliable metric. |
| Persistent UID | INT | 0 | -10000 – 10000 | Uniquely identifies the modifier within the modifier stack that it is part of |
| Layer | STRING | – | – | Layer name |
| Use Layer Pass | BOOLEAN | uit | – | Use layer pass filter |
| Layer Pass | INT | 0 | 0 – 100 | Layer pass filter |
| Invert Layer | BOOLEAN | uit | – | Invert layer filter |
| Invert Layer Pass | BOOLEAN | uit | – | Invert layer pass filter |
| Layer Group | BOOLEAN | uit | – | Filter by layer group name |
| open_influence_panel | BOOLEAN | uit | – | |
| open_custom_range_panel | BOOLEAN | uit | – | |
| Segments | COLLECTION | – | – | |
| Active Time Segment Index | INT | 0 | 0 – 10000 | Active index in the segment list |
| Mode | ENUM | NORMAL | Regular, Reverse, Fixed Frame, Ping Pong, Chain | |
| Frame Offset | INT | 1 | -32768 – 32767 | Number of frames to offset original keyframe number or frame to fix |
| Frame Scale | FLOAT | 1 | 0.001 – 100 | Evaluation time in seconds |
| Start Frame | INT | 1 | 0 – 1048574 | First frame of the range |
| End Frame | INT | 250 | 0 – 1048574 | Final frame of the range |
| Keep Loop | BOOLEAN | aan | – | Retiming end frames and move to start of animation to keep loop |
| Custom Range | BOOLEAN | uit | – | Define a custom range of frames to use in modifier |
Noise en Thickness samen
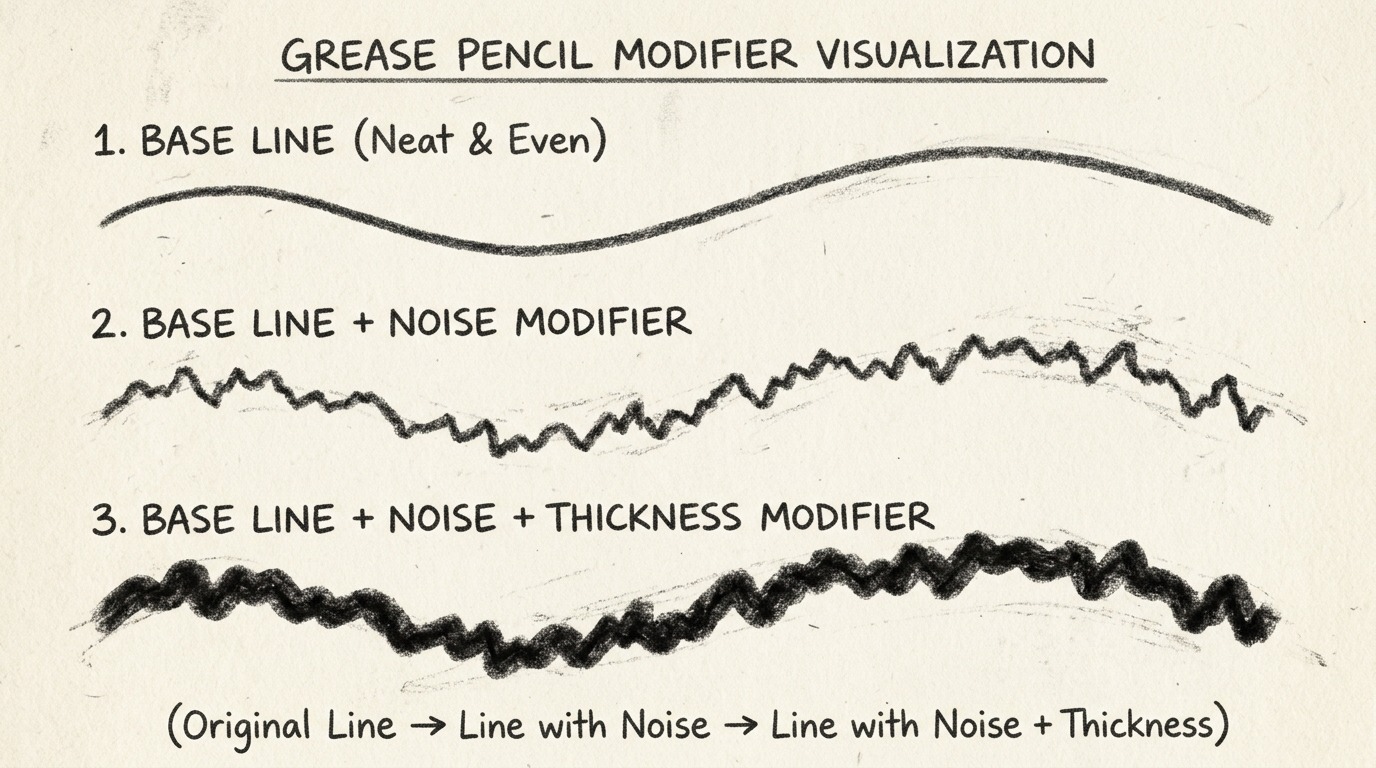
- 1Origineel
De strak getekende, ongewijzigde stroke.
- 2+ Noise
Lichte, organische beving in positie en dikte.
- 3+ Thickness
Extra globale verdikking bovenop de Noise.
Tint · Vertex Weight Angle · Vertex Weight Proximity
Tint — Mengt een gekozen kleur door strokes en fills heen volgens een instelbare factor. Snel een hele tekening een sfeerkleur geven, bijvoorbeeld voor een avond- of onderwaterscène, zonder elk materiaal te herschilderen.
| Instelling | Type | Standaard | Bereik | Wat hij doet (tooltip uit Blender) |
|---|---|---|---|---|
| Apply on Spline | BOOLEAN | uit | – | Apply this and all preceding deformation modifiers on splines' points rather than on filled curve/surface |
| Execution Time | FLOAT | 0 | -10000 – 10000 | Time in seconds that the modifier took to evaluate. This is only set on evaluated objects. If multiple modifiers run in parallel, execution time is not a reliable metric. |
| Persistent UID | INT | 0 | -10000 – 10000 | Uniquely identifies the modifier within the modifier stack that it is part of |
| Layer | STRING | – | – | Layer name |
| Use Layer Pass | BOOLEAN | uit | – | Use layer pass filter |
| Layer Pass | INT | 0 | 0 – 100 | Layer pass filter |
| Invert Layer | BOOLEAN | uit | – | Invert layer filter |
| Invert Layer Pass | BOOLEAN | uit | – | Invert layer pass filter |
| Layer Group | BOOLEAN | uit | – | Filter by layer group name |
| Material | POINTER | – | – | Material used for filtering |
| Use Material Pass | BOOLEAN | uit | – | Use material pass filter |
| Material Pass | INT | 0 | 0 – 100 | Material pass |
| Invert Material | BOOLEAN | uit | – | Invert material filter |
| Invert Material Pass | BOOLEAN | uit | – | Invert material pass filter |
| Vertex Group | STRING | – | – | Vertex group name for modulating the deform |
| Invert Vertex Group | BOOLEAN | uit | – | Invert vertex group weights |
| Use Custom Curve | BOOLEAN | uit | – | Use a custom curve to define a factor along the strokes |
| Curve | POINTER | – | – | Custom curve to apply effect |
| open_influence_panel | BOOLEAN | uit | – | |
| Mode | ENUM | BOTH | Stroke & Fill, Stroke, Fill | Attributes to modify |
| Factor | FLOAT | 0.5 | 0 – 2 | Factor for tinting |
| Tint Mode | ENUM | UNIFORM | Uniform, Gradient | |
| Color | FLOAT | 0 | 0 – 1 | Color used for tinting |
| Color Ramp | POINTER | – | – | Gradient tinting colors |
| Object | POINTER | – | – | Object used for the gradient direction |
| Radius | FLOAT | 1 | 0.001 – onbegrensd | Influence distance from the object |
| Use Weight as Factor | BOOLEAN | uit | – | Use vertex group weight as factor instead of influence |
Vertex Weight Angle — Genereert vertex-gewichten op basis van de hoek van elk strokesegment ten opzichte van een gekozen as. Automatisch een gewichtsgroep opbouwen voor bijvoorbeeld een Armature-modifier zonder handmatig te schilderen.
| Instelling | Type | Standaard | Bereik | Wat hij doet (tooltip uit Blender) |
|---|
Vertex Weight Proximity — Genereert vertex-gewichten op basis van de afstand tot een ander object, net als de mesh-tegenhanger. Automatisch een gewichtsgroep opbouwen voor een overgang die dichter bij een doelobject sterker moet zijn.
| Instelling | Type | Standaard | Bereik | Wat hij doet (tooltip uit Blender) |
|---|---|---|---|---|
| Apply on Spline | BOOLEAN | uit | – | Apply this and all preceding deformation modifiers on splines' points rather than on filled curve/surface |
| Execution Time | FLOAT | 0 | -10000 – 10000 | Time in seconds that the modifier took to evaluate. This is only set on evaluated objects. If multiple modifiers run in parallel, execution time is not a reliable metric. |
| Persistent UID | INT | 0 | -10000 – 10000 | Uniquely identifies the modifier within the modifier stack that it is part of |
| Vertex Group | STRING | – | – | Vertex group name |
| Proximity Mode | ENUM | GEOMETRY | Object, Geometry | Which distances to target object to use |
| Proximity Geometry | ENUM | Vertex, Edge, Face | Use the shortest computed distance to target object's geometry as weight | |
| Target Object | POINTER | – | – | Object to calculate vertices distances from |
| Lowest | FLOAT | 0 | 0 – 1000 | Distance mapping to weight 0.0 |
| Highest | FLOAT | 1 | 0 – 1000 | Distance mapping to weight 1.0 |
| Falloff Type | ENUM | LINEAR | Linear, Custom Curve, Sharp, Smooth, Root, Sphere, Random, Median Step | How weights are mapped to their new values |
| Invert Falloff | BOOLEAN | uit | – | Invert the resulting falloff weight |
| Normalize Weights | BOOLEAN | uit | – | Normalize the resulting weights (otherwise they are only clamped within 0.0 to 1.0 range) |
| Mapping Curve | POINTER | – | – | Custom mapping curve |
| Influence | FLOAT | 1 | 0 – 1 | Global influence of current modifications on vgroup |
| Mask Vertex Group | STRING | – | – | Masking vertex group name |
| Invert | BOOLEAN | uit | – | Invert vertex group mask influence |
| Masking Tex | POINTER | – | – | Masking texture |
| Use Channel | ENUM | INT | Intensity, Red, Green, Blue, Hue, Saturation, Value, Alpha | Which texture channel to use for masking |
| Texture Coordinates | ENUM | LOCAL | Local, Global, Object, UV | Which texture coordinates to use for mapping |
| UV Map | STRING | – | – | UV map name |
| Texture Coordinate Object | POINTER | – | – | Which object to take texture coordinates from |
| Texture Coordinate Bone | STRING | – | – | Which bone to take texture coordinates from |
Grease Pencil als hulpmiddel in een 3D-scène
Buiten pure 2D-animatie duikt Grease Pencil voortdurend op als hulpmiddel: Annotate (de eenvoudige tekenlaag die nooit meerendert, enkel voor notities tijdens het werken), storyboards die je letterlijk vóór de camera van een 3D-scène tekent, of een handgetekende overlay-textuur (rook, vonken, een NPR-outline) die je met de Line Art-modifier automatisch laat genereren vanuit de echte 3D-geometrie in de scène.
RECBLENDER 5.1 · F76-GP-OBJECT00:00:00:001920×1080Zelf proberen: een kort loop-frame met Build
Open start_grease_pencil.blend: een leeg Grease Pencil-object met drie lagen staat klaar. Teken een klein pictogram en laat het zichzelf opbouwen.
- 1Ga naar Draw Mode en teken met de Draw-tool een eenvoudig pictogram op de Lijnen-laag.
- 2Wijs een materiaal met enkel Stroke (geen Fill) toe voor een schetsachtig effect.
- 3Voeg een Build-modifier toe en zet de Length op de duur van je animatie.
- 4Speel de tijdlijn af en controleer dat het pictogram zichzelf lijn na lijn opbouwt.
- 5Voeg tot slot een Noise-modifier toe met een lage sterkte voor een handgetekend trilleffect.